| |
|
A publication of the Information Development department
Vol 4, Issue 1
March 2004
We're sure you are all anticipating the next version of our product, FirstClass 8.0, which will be one of our most feature-packed releases ever.
We know you are eager to see the new features and functionality and how they will add value to your FirstClass sites. As we near the release date, we will showcase some of the more exciting changes to our software in upcoming issues of the newsletter, so stay tuned. However, just to whet your appetites, we have included a brief overview of the coming contact management 8.0 feature.
Also this year, we will be adding a new section called "Ideas for end users" that will provide ideas about some of the things you and your users can do with FirstClass. It will focus on some of the different ways you can use the product, rather than describing features.
Finally, be on the lookout for a radically different newsletter design. We're giving the newsletter a major facelift that promises to be sleeker, more streamlined, smaller in size, and in tune with the Open Text color scheme. We know that those of you who receive the fully formatted version of this document will appreciate the interface changes. Those of you who receive the text-only version will be able to view the new format on our web site in the newsletter archives.
Of special note in this issue
Along with our regular features, we have included two articles contributed by our newsletter subscribers:
• an example of using FirstClass gateways by Stewart Lynch, FirstClass administrator, Richmond, BC
• a Mac OS X backup script by Werner de Jong, Professional Services Manager, Open Text Corporation - FirstClass Division.
We wish you a successful year ahead and we hope you continue to enjoy The FirstClass Newsletter and contribute ideas and content.
Enjoy this issue.
Editors
Annette Ferron
Ann Schwartz
Top ten reasons why FirstClass documents are better than Microsoft Word documents
Backup strategy for Mac OS X 10.2.6 or later
What to look for in future issues of the FirstClass Newsletter
Feedback? Questions? Topic ideas?
New training courses and where to find documentation
Where to find previous newsletter issues
Subscribe other members of your organization
Courtesy of Stewart Lynch, Director of Instruction, Technology and Information Services, Richmond School District
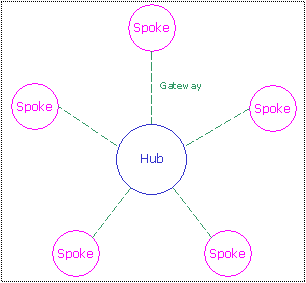
Our school district's FirstClass server acts as the hub for a number of other school districts with which we replicate a number of conferences. The purpose is to share ideas and open discussions between like-minded people. However, making sure that all of the connecting districts follow proper procedures can be a bit tricky, so I have developed some standard procedures for connecting districts to follow.
In this discussion, I refer to "Hub" as the the central FirstClass server to which all spoke sites connect, and will speak as the Hub administrator. I refer to "Spoke" as the connecting site. In our real site setup, we have a number of different sites (or spokes) gatewaying to our own site.
This article discusses how we would connect a new Spoke site to our Hub site.
The following is the standard procedure that would be followed:
Creating the gateway
The first step is for both the Spoke and Hub administrators to create a simple working gateway to each other and to make sure that mail correctly passes between the two FirstClass systems.
Phase 1: Create and configure the gateway
This is how both the Spoke and Hub administrators should create and configure their gateway forms:
1 Open the Gateways folder on the administrator's Desktop.
2 Choose Admin > Add > Add Gateway Settings.
This will open a new gateway form.
3 Enter the gateway information on the Main tab.
For example, the Spoke administrator enters the Hub "Gateway name" (HubNet) and the Hub "Remote server serial number" (1234567) on the Main tab of their Gateway form. As the Hub administrator, I enter the Spoke "Gateway name" (SpokeNet) and the Spoke "Remote server serial number" (98765432) in these fields on the Hub system.
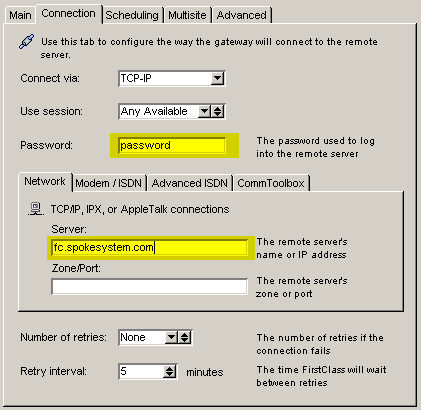
4 Enter the server address of the system to which you are connecting on the Connection tab.
For example, as the Hub administrator, I enter the Spoke address (fc.spokesystem.com) and the Spoke system administrator enters the Hub address (fc.HubSystem.com). The rest of the fields are specific to our individual site setups.
5 Both sites must have the same password in the "Password" field.
Both site administrators have to agree on a unique password. For example, both myself and the Spoke administrator agree on the password "password".
6 Close the form to save the changes, then reopen it.
7 Click the Directory button on the Gateway form.
8 Enter the same password from step 5 in the "Password" field and then save and close the Gateway Directory Information form.
9 Click the Scheduling tab on the Gateway Settings form.
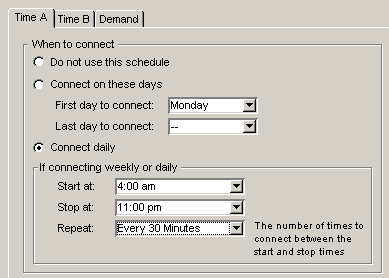
10 Set the connection schedule for the gateways.
One system has to set the schedule. In our own setup, I let the Spoke administrator set their own schedule.
11 On the Multisite - Inbound tab, each site configures what works best for their system.
12 On the Multisite - Outbound tab, select "Export routes and gateways".
Both systems must have this option enabled to talk to each other.
If all the connecting systems (Spoke sites) are small, you can select "Export Directory names". If you do this, your users will have a larger than normal Directory to choose from when entering names in the "To" field.
Phase 2: Test the connection
The next step is to test to see if emails are getting through to both gatewayed systems. To do this, send an email to the Spoke administrator at Administrator,SpokeNet (where Spoke is replaced by the Spoke system's name) and have the Spoke administrator send an email back to me at Administrator,HubNet (where Hub was replaced with the name of the Hub gateway).
Once the emails are sent, you can wait for a scheduled connection or one of the administrators can force a connection by clicking this button on the Gateway form:
Choosing the conferences to share
Once the gateway is established and email is getting through, you have to decide which conferences to replicate, how to replicate them, and what permissions to set.
To synchronize items in a conference, the following must be true:
• the original name (not alias name) of the conference on both the local and the remote Desktops must be identical
• the conference must be at the root level of both gateway Desktops
• the local conference (the one on your system) must have permissions set so that the remote gateway is allowed to contribute.
You do not need to designate the Contributor permission specifically, you just have to make sure that if you set All Users to Disallowed as the last line of a permission list, that there is some provision above it for the Spoke system to be able to contribute.
The SpokeNet system can name the Hub specifically:
While the Hub system, which has many spokes, can use "Other Sites" to include all gateways.
Note that the Internet is a gateway, so you should put it first in the list to Disallow access to Internet postings.
Creating the conferences at the Spoke site
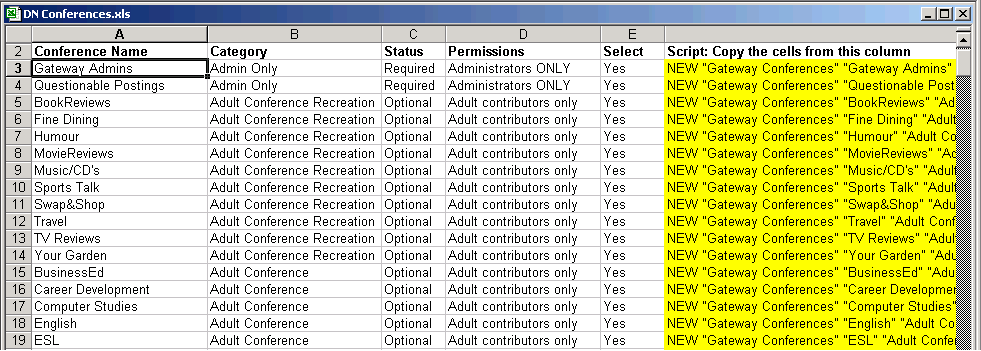
As administrator of the Hub site, I have found it helpful to keep track of all shareable conferences in a spreadsheet. I have created an Excel spreadsheet that contains the names and relevant information of each conference Spoke sites may want to replicate on their systems.
Use the spreadsheet as a guideline when building your conferences and the batch admin script to create your conferences.
To create your conference replication structure:
1 Create a conference called 'Gateway Conferences' on the administrator's Desktop.
2 Open the spreadsheet.
Click here to access the spreadsheet.
You can unprotect the sheet and change the names of the conferences to suit your needs. The yellow column is a calculated field that will change automatically based on the values in column A. There are two cells that you cannot change. They are the first two Admin Only conferences (Gateway Admins and Questionable Postings). These are required conferences for all sites connecting to our Hub server.
When the worksheet is protected all you will be able to modify is the "Select" column. The idea here is that you can select which conferences you want on your local system. To select a conference, click its corresponding cell in the "Select" column and choose Yes. Omit conferences by choosing No:
If you choose "No", the batch admin script in the yellow cell disappears.
3 Copy the yellow column to the clipboard (including empty cells, if present).
4 Log into the FirstClass server as the administrator.
5 Create a new message and address it to batch admin.
6 In the first line of the message body, type
Reply
7 Paste the contents of the clipboard into the message body below Reply.
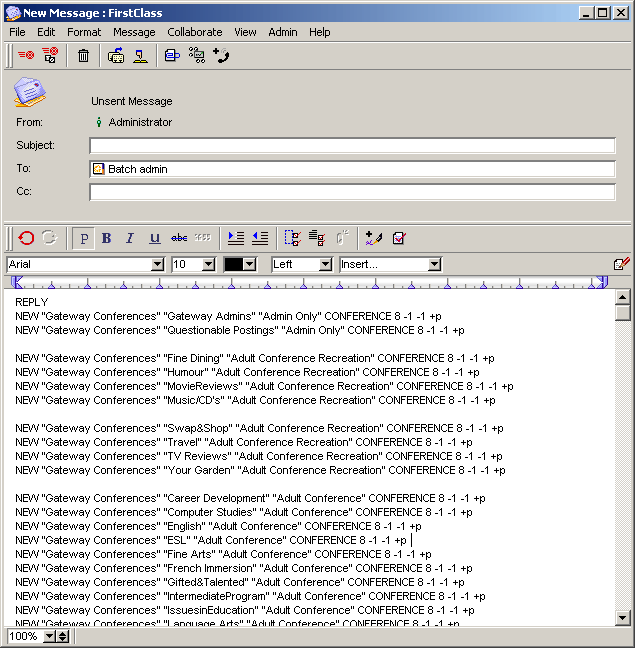
The message will look something like this:
8 Send the message.
This will populate the Gateway Conferences conference on your administrator Desktop with the conferences you have chosen.
If you have correctly created the Gateway Conferences conference on your Desktop, batch admin will send back a blank reply (which is what you want). If the reply has errors, you have either not spelled the name of the conference correctly or you have one or more conferences with the same name.
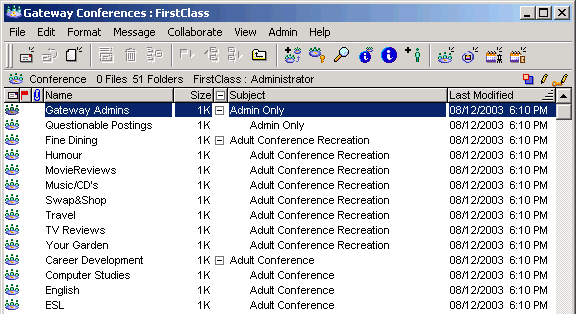
Open the Gateway Conferences conference to see all of the conferences you just batched in. It will look something like this:
Setting conference permissions
The next step is to set the appropriate permissions for each conference. This has to be done before you replicate any information. All local conferences must make sure remote gateway is not denied contribution status on the Conference permissions form. Also, some of the conferences have other permissions that must be applied.
In the following examples, assume the following:
• HubNet refers to the Hub site's system
• DistrictNet is the global name that refers to our network of Hub and Spoke systems
• AdminGroup is either a group that has all of the gateway administrators on your system as members, or are the name(s) of individual(s) who are going to be monitoring the DistrictNet system.
We have four kinds of available conferences:
• Admin Only
• Adult Conferences
• Open Conferences
• Student Conferences
Admin Only
The conferences in this category (Gateway Admins and Questionable Postings) should be monitored by members of AdminGroup.
The permissions for the Admin Only conferences should look something like this:
Adult Conferences
These conferences should be restricted to adults on your system (including all gateways).
You must have the ability to distinguish between adults and students on your system and set the permissions accordingly.
This should be your set of permissions for these conferences:
Open Conferences
These conferences should be open to everyone on your system (including all gateways). This is what your set of permissions for these conferences should look like:
There is one exception and that is the This_Day_In_History conference which is read only.
Student Conferences
These conferences should be open to everyone on your system. Establish a set of student moderators for these conferences. This should be your set of permissions for these conferences:
Creating conference policies and banners
Our current group of gateway administrators have agreed on some limitations to content that can be posted in some conferences. Good taste applies to all postings and if there are any violations, a notification must be sent to the Questionable Postings conference that indicates the location and subject of the objectionable messages.
Deleting a message from your local conference does not delete it from the other sites. Therefore, you must let other administrators know if you find an objectionable message, as it has likely been replicated across the network.
To help us communicate the limitations, I have created a series of banners for the top pane of conferences.
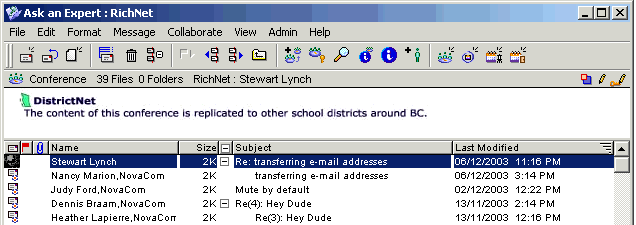
We use the wording below as banners in all of the gateway conferences. This lets our users know that the readership goes beyond the local system. This is advisable for all gateways as users tend to think that all messages are local and thus are not aware of the larger audience.
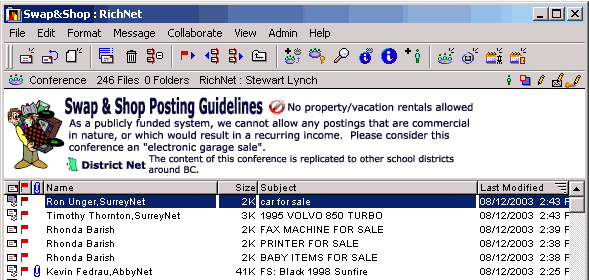
Some conferences have additional instructions in the banner:
Adding the banners as background images
To add the banner to the top pane, add the background images to the FC Resource Registry folder (you can also place them inside the Multi-Site Setup folder (both located on the administrator's Desktop)). Open each conference and chose View > Change View Properties to apply the image to the conference (see the Client help in online help for further information).
Aliasing conferences to the Spoke gateway Desktop
The following steps are performed at the Spoke site.
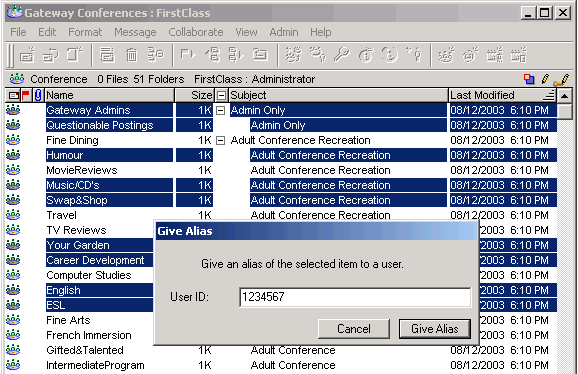
After creating your own conference policies and banners, alias the conferences to the gateway Desktop in preparation for replication. To do this, open the Gateway Conferences conference and select the objects you want to replicate. Then, choose Admin > Give Alias and enter the Hub gateway ID in the "User ID" field. This puts an alias of all conferences you selected onto the gateway Desktop.
Verify that the conferences are on the gateway Desktop by doing the following:
1 Open the Gateways folder.
2 Double-click the Hub gateway and click the Directory Information button.
3 Click the Desktop button.
This opens and displays all of the items on the local gateway Desktop. All of the regional conferences must also be on the remote gateway Desktop.
Aliasing the same conferences to the Hub (Remote) gateway Desktop
Once the conferences are aliased to the Spoke gateway Desktop, alias the same conferences to the Hub system's gateway Desktop. To log in as the gateway follow these steps:
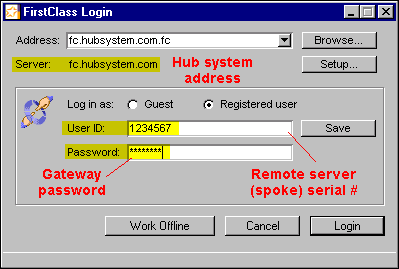
1 Log into the Hub site using the Spoke server serial number as the User ID and the agreed-upon gateway password that is in the gateway form.
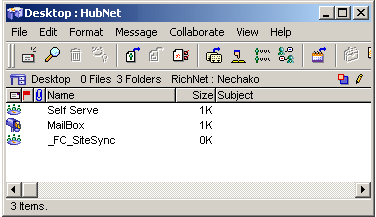
This displays the Spoke gateway Desktop on the Hub system.
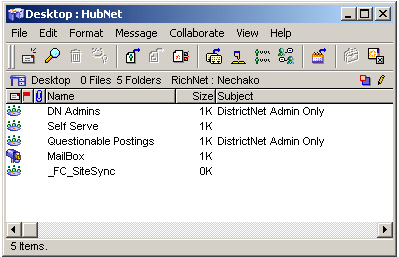
2 Open the Self Serve conference and selected the DN Admins and Questionable Postings conferences.
3 Choose Collaborate > Add to Desktop.
This adds these two conferences to the root level of the remote gateway Desktop.
4 Open each of the subcontainers and repeat Step 3 for all of the conferences that you have on your local gateway.
At the next scheduled connection all unread content will begin to replicate.
If you want to force a replication of selected or all items to ensure both old (unflagged) and new (flagged) items are replicated:
1 Log into the Hub site as the gateway (as described above)
2 Open the conferences for which you wish to have old content replicated.
3 Select the messages you wish to replicate and choose Message > Mark as Unread.
This will indicate to the gateway that the items have not yet been read and they will be replicated at the next scheduled connection.
This feature has not yet been released. Therefore, the feature is subject to change.
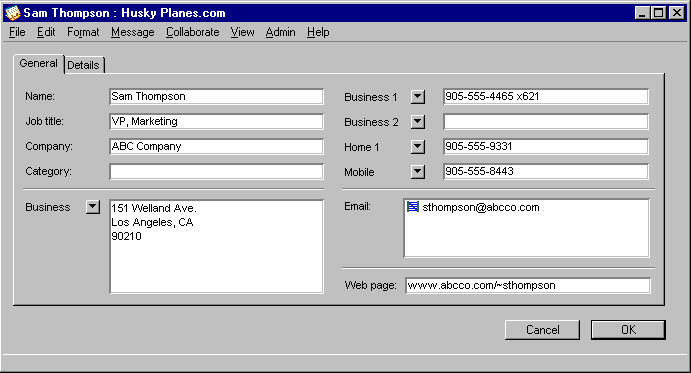
You are likely familiar with the FirstClass address book, where each user can store personal addresses and mail lists that appear in that user's view of the Directory. For 8.0, this feature will be significantly enhanced. In honor of its coming of age, we are calling it the contact management feature.
What's new about contact management
New users will find a Contacts folder on their Desktops, in place of an address book. In addition, you and your users can:
• display entries in an Index Card view
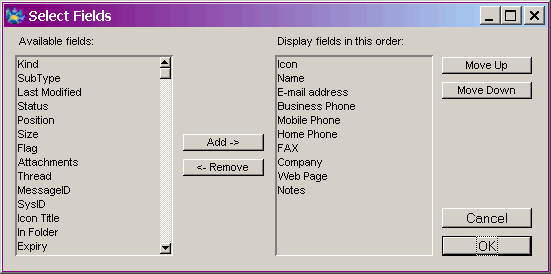
• display the columns you want in List view easily, using a Select Fields form:
• update information displayed in List or Index Card view, without having to open forms
• add rich content, such as pictures and links, to the body of a personal address form, just as you would to a message
• open personal address forms by double-clicking Internet addresses or phone numbers in message "To" and "From" lists (Instant Lookup)
• create public contact databases, to share contact information with other users
• create containers within a contact database, to organize contact information
• choose which style of personal address form to use for a specific contact database
• import and export personal addresses in vCard format, and export personal addresses in Excel format (previous to 8.0, you could already import personal addresses in Excel format).
If you are using FirstClass Unified Communications, you can also make phone calls directly from a contact list.
The Contacts folder
Each user's Contacts folder is really a private version of a public contact database. Users can create containers within it, just as they can for public contact databases.
About contact databases
You and your users can create contact databases, and assign permissions to make them available to other users on a read only or read/write basis, just as you would create conferences. When you assign permissions to a contact database, you can choose to use the standard FirstClass personal address form in that contact database, use a form that is familiar to Outlook users, or use a form that is familiar to Palm users.
Personal addresses created in a contact database aren't displayed in the Directory. To make them appear in the Directory, you must place a link to the contact database in your Contacts folder, or copy entries from the contact database to your Contacts folder.
Index Card view
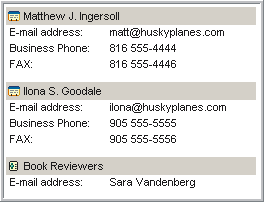
Index Card view is a new view that presents contact information in a view that looks like this:
This view shows a summary of standard information, so that you can perform basic tasks, such as phoning a contact, without having to open that user's form.
Grouping contacts
You can create containers within your Contacts folder or a contact database to organize your contact information. For example, you might create a contact database within your Contacts folder for all contacts involved with a special project.
As for any contact database, you can share this group contact database with other users.
Importing and exporting personal addresses
In addition to importing personal addresses in Excel format, you can now import these addresses in vCard format, and export them in either format.
When you import personal addresses in vCard format, they are recreated as FirstClass personal addresses in your Contacts folder. If there is information that doesn't belong in any of the FirstClass personal address fields, it is placed on the Notes tab.
When you export FirstClass personal addresses, you choose the format you want as part of the export. Personal addresses are either converted to vCard format and placed in a .vcf file, or converted to Excel format and placed in a .csv file.
An example of contact databases in action
Michael Green is the vice president of Sales and Marketing at Husky Planes. He has decided to reorganize his contact list, as he has business contacts mixed up with personal contacts, and he wants to share some of his business contact information with others.
To accomplish this, he
• created contact databases within his Contacts folder for the different types of contacts, and shared these contact databases with others
• added rich content, such as pictures and links, to some of his contact information
• used personal address forms that were familiar to users.
Creating contact databases
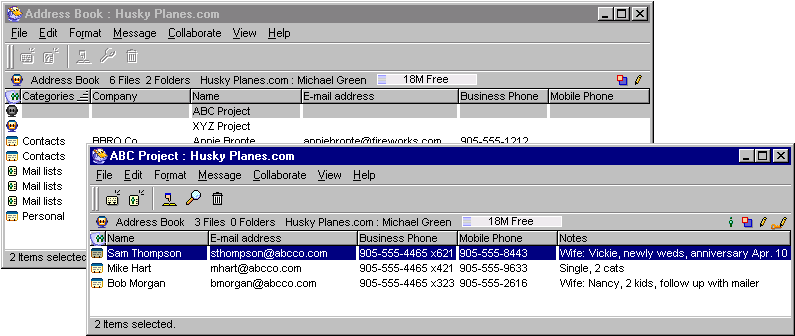
Michael created contact databases within his Contacts folder for personal contacts and contacts involved on the various projects he is overseeing, including the ABC project and the XYZ project.
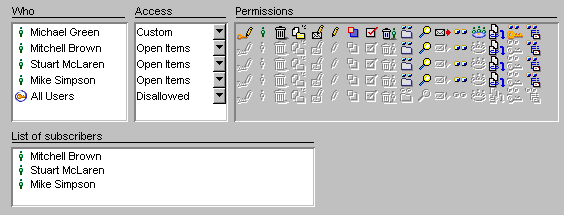
He shared his ABC project and XYZ project contacts with the appropriate salespeople by giving them permissions to view those contact databases. This is the permissions form for the ABC project contact database.
Adding rich content
Michael added links to some of his contacts' web pages on their personal address forms. Also, he had some pictures on file that were taken at a recent trade show hosted by one of his contacts, so he also attached them to the personal address form of that contact.
Changing the personal address form
The salesperson responsible for the ABC project was recently hired from a company that used Microsoft Outlook's contact management. To make the transition easier for him, Michael changed the personal address form used by the ABC project contact database to one that would look familiar to Outlook users:
He did this by choosing Outlook at "Form to use" on the ABC project contact database's permissions form.
1 Open the Basic Internet Setup form in the Internet Services folder on the administrator's Desktop.
2 Select the "Disable all relaying, including SMTP AUTH and trusted IPs" field on the UCE/Spam tab.
3 Open the Advanced Directory form in the Internet Services folder.
4 Ensure that the "Inbound mail addressing" field is set to Aliases Only.
Some servers will blacklist your server if the "Inbound mail addressing" field is set to Allow Short Forms or Exact Match Only. This is because the mail server will not reject incoming messages instantly in a way that the blacklist tests expect. This can cause some blacklist tests to fail and the server to be blacklisted. The best approach is to use Aliases Only, which will deliver an instant response to any incoming mail; it is either accepted or rejected.
Using Aliases Only allows only exact matches to the aliases set on the User Information form.
Now that you are certain the server is not an open relay you can contact the individual servers and RBL providers that have blacklisted your server and ask them to retest it. You can test your server using one of many online open relay tests such as http://www.abuse.net/relay.html. It is best to check with the provider that blacklisted your server, as they will usually provide guidance on which tests they use. Some servers will also attempt a reverse DNS lookup on your mail server address, and reject mail if this test fails. If your server continues to be blacklisted, you should ensure a reverse DNS lookup works as expected.
Relative links
An example of where relative links are used is in a self-contained set of documents like our online help. The whole set of documents can be moved to your own server, and links among the documents will still work.
A relative link consists of only a relative path. It doesn't include any server identification. If the target object is in a different subcontainer from the object containing the link, the path starts with the container that is common to both. For example, ../ indicates the path starts at the container above the current container, ../../ indicates that the path starts two containers above the current
container, and so on.
If you copy a relative link, FirstClass converts it to an absolute link on the clipboard (because it could be pasted anywhere). If you paste this link back into a FirstClass object, it is converted back to a relative link, as long as the conditions required for a relative link are met.
By default, FirstClass creates relative links in documents, as long as there is a common container for the documents somewhere in the link paths.
Absolute links
With absolute links, you need to include the full path, including server identification (for example, a protocol specifier, such as FCP) and a server address, to ensure that the link still works.
By default, FirstClass creates absolute links in messages, and in documents that don't share a common container in their paths.
Changing link types
You can manually change a link from relative to absolute, or vice versa. To do this, change the link path at "Target URL" on the Format Link form. For example, the relative path
../budget/report
could be turned into the absolute path
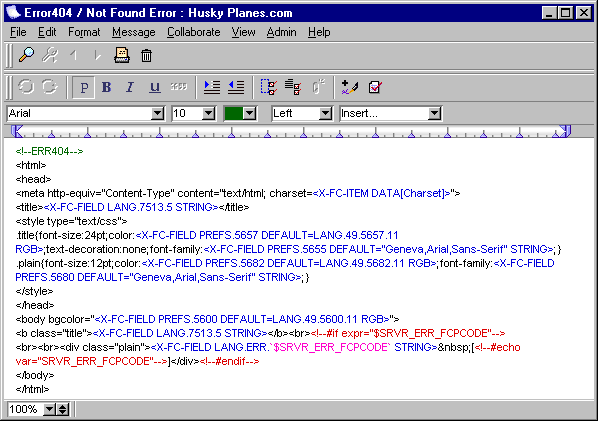
Here is an example of the Error404 template:
Courtesy of Jeff Catania, School Programs Coordinator, Halton District School Board
1 FirstClass documents can be opened by ANY user but there are always those who cannot open Microsoft Word, Powerpoint, Appleworks or even Adobe .pdf files.
2 FirstClass documents can be saved to a hard drive or printed just like other documents. Further, FirstClass documents can be easily toggled for online or page viewing. FirstClass documents also allow for a robust set of formatting options (for example, paragraph formatting, embedded images), including tables for FirstClass 8.0.
3 FirstClass documents are easily updated online so the information is always the most current. Online information/processes/procedures can be refined and improved rather than forgotten, ignored, or reinvented. Using Microsoft Word or other files results in different versions of the same information "out there" and the cumbersome revision process required discourages updating.
4 FirstClass documents are more compact (can be 2 to 50 times smaller than .doc, .ppt or .pdf) and therefore faster to open, especially on slow connections. This is due in large part to the fact that graphics are embedded in PNG format, which renders in a much smaller size than other standard formats.
5 A FirstClass document represents an online, single-source piece of information. Using a Word file results in multiple users saving copies locally, thus greatly increasing version confusion and server storage requirements in the system.
6 FirstClass documents can be searched online (search titles and/or contents and even include subfolders) to find relevant information. Attached or uploaded files cannot be searched.
7 FirstClass documents can be hyperlinked online from other FirstClass objects and even within their own content using markers. Attached files cannot be linked.
8 FirstClass documents never expire, but messages with file attachments (like Word) do.
9 FirstClass documents can be shared to the web easily and powerfully so that intranet content also becomes Internet content. The potential to "webify" board policies and procedures with no conversion/duplication is huge.
10 FirstClass documents encourage flexible online knowledge management rather than paper-based management. They can be read-only or shared.
Courtesy of Werner de Jong, Professional Services Manager, Open Text Corporation - FirstClass Division
Introduction
The FirstClass post office contains all FirstClass objects, such as messages, documents and uploaded files. Needless to say, preservation of this information is of paramount importance. Therefore every FirstClass server installation requires a backup strategy.
This article describes how to configure FirstClass 7.1 for backups using the UNIX capabilities of Mac OS X.
What needs to be backed up
On Mac OS X, the following folders (and their subfolders) need to be backed up:
• /Library/FirstClass Server
FirstClass software, including the post office, to be backed up at least once a month.
• /Library/FirstClass Server/Volumes/Master/fcpo
The default (live) post office, to be backed up daily.
• /Library/FirstClass Server/Volumes/XXXX/fcpo
Where XXXX represents other volumes that have been approved for use with FirstClass and contain users and conferences.
You cannot create a reliable backup of the post office while the FirstClass server is running with any software other than FirstClass mirroring.
Multiple post offices work in conjunction with each other and thus must be backed up and restored as a set.
Offline and online backups
There are two methods available to back up a FirstClass server:
• offline backups
The FirstClass server is shut down while you run the backup.
• online backups.
The FirstClass server stays up while you run the backup, which can be achieved exclusively by using FirstClass mirroring.
Offline backups
To perform an offline backup, you simply shut down the server and run the backup software.
Pros:
• minimum disk space requirements
• simple to set up
• simple to restore.
Cons:
• system unavailable during backup
• a disk failure will result in loss of data of up to a day.
Online backups
To perform an online backup, you need to enable FirstClass mirroring. When the backup software is run, pause the mirror. After the backup is completed, resume the mirror. FirstClass will take care of the resynchronization.
Pros:
• system available during backup
• protected against disk failures without loss of data (assuming you mirror to a separate storage device)
• simple to set up
• immediate recovery in the event of loss of the main post office.
Cons:
• a separate disk system (device or networked) is required for optimal reliability
• some minimal additional work needs to be done to restore data.
Enabling FirstClass mirroring
To configure FirstClass mirroring, you need to create a folder or a symbolic link (Mac OS X aliases do not work) to a folder that may reside on a networked machine in the /Library/FirstClass Server/Volumes folder. The default volume is called Master, which is where the FirstClass post office is created upon software installation.
The easiest method is to create a folder called Mirror inside the /Library/FirstClass Server/Volumes folder. Ideally, this folder should be a symbolic link to a folder on a secondary disk (not the root) or a networked folder. This way, you are protected against primary hard disk failures.
To create a link to the Mirror folder on a machine called "hostname" on a Mac OS X system using the SMB protocol, you can use the Terminal application (in the Applications/Utilities folder) to enter the following commands:
[machine-name:~] fcadmin% cd /Library/FirstClass\ Server/Volumes
[machine-name:/Library/FirstClass Server/Volumes] fcadmin% mount_smbfs -I hostname //workgroup\;userid:password@server/share ./Mirror
The SMB protocol is particularly suitable when connecting to a Windows system.
To create an AppleShare link, use these commands:
[machine-name:/Library/FirstClass Server/Volumes] fcadmin% mount_afp afp://userid:password@hostname/share ./Mirror
If you used Filer to connect to a networked machine, use these commands:
[machine-name:/Library/FirstClass Server/Volumes] fcadmin% ln -s /Volumes/hostname/share ./Mirror
You can now make this volume available to FirstClass.
To enable the volume for FirstClass mirroring:
1 Log into FirstClass as admin.
2 Open the Volumes folder.
A list of available volumes will appear, with one volume marked as "primary". The volume we just created is included in the list.
3 Select the volume and open the Get Info form.
4 Change the status of the new volume on the Volume Usage tab from "Browse only" to "Limited use".
Although you can use "Full use" volumes for mirroring, it will complicate the restore of the mirror volume. You should only use the "Full use" volume if you use the secondary volume to create users and conferences.
The final step is to start the mirroring:
1 Open the Volumes folder.
2 Select the volume you wish to mirror and open the Get Info form.
3 Select "Enable disk mirroring for this volume" on the Disk Mirroring tab.
4 Choose the volume that you have just approved at "Mirror to".
If you have multiple volumes approved for Full Use and containing FirstClass user or conference data, they must ALL be set up to mirror. You cannot choose to mirror a primary volume and not mirror a secondary volume that contains conferences.
For information on server mirroring, see the FirstClass Administrator's Guide in the online help.
Automated backups
You can automate your backups using AppleScript or Bourne Shell scripts. Bourne Shell scripts can be scheduled using the standard crontab utility available on Mac OS X.
There are links to six sample scripts below, which are Bourne Shell scripts. The first three scripts use the RSYNC command as a way to back up data. The RSYNC command is a fast remote-update protocol that enables the transfer of the differences between two sets of files across a network link. You can use a RSYNCed copy of the FirstClass data for writing to relatively slow media (for example, tapes).
fcbackup.sh
The fcbackup.sh script is a full-featured application to control your backups, including support for daily, weekly, and monthly rollovers. It is the most sophisticated and user friendly of the three backup scripts. It can be used in any situation whether you have enabled mirroring or not.
Only the fcbackup.sh script is capable of backing up all post offices and mirror folders automatically, without any modifications.
fcbackupmirror.sh
The fcbackupmirror.sh script pauses the FirstClass mirror, copies mirrored data to another folder, and resyncs the FirstClass mirror. You can use this script if you have enabled mirroring.
fcbackuppo.sh
The fcbackuppo.sh script stops the FirstClass server, copies the FirstClass post office to another folder, and restarts the server. You can use this script if you have not enabled mirroring.
stopmirror.sh
The stopmirror.sh script stops FirstClass mirroring and must be run before starting the external backup tool.
If you have approved multiple volumes for full use and these volumes contain user or conference data, you must pause ALL FirstClass mirroring and back up ALL mirrored post offices at the same time. You will need to modify the scripts accordingly.
startmirror.sh
The startmirror.sh script restarts FirstClass mirroring and must be run after the backup is completed.
fcbackupinit.sh
The fcbackupinit.sh script automatically installs, configures and enables the RSYNC server on a remote machine, which can be used with the fcbackup.sh script. A remote RSYNC server makes it possible to reliably back up over a network connection, without having to depend on network shares.
See the appendix at the end of this article for details.
The fcbackup.sh script
You can fully control the fcbackup.sh script using command line parameters. There are no source code changes required.
The command syntax is:
fcbackup.sh [-hfndmwvV] [-l file] [-t tracelevel] mirror | fcpo | apps [destination]
The following command line parameters are available:
• -h
Display this information.
• -f
Force stop of the FirstClass core server and Internet Services while backing up the application folder.
• -n
Prevent automated backup from setting owners and permissions. This may be useful when you encounter error messages while copying to a network share.
• -d
Use a daily backup rollover. Every time this application runs, it overwrites a previous backup. Storage required is twice the size of your post office.
• -m
Use a monthly backup rollover. This is useful for creating daily backups, allowing a rollback of one month. Storage required is 31 times the size of your post office.
• -w
(Default) Use a weekly backup rollover. This is useful for creating daily backups, allowing for a rollback of one week. Storage required is seven times the size of the post office.
• -v
Display application version number and release date.
• -V
Display application version number and release date and exit.
• -l file
Write the output to the specified log file. Upon reaching the maximum log file size (100 Kbytes), the file will be backed up and a new one started.
• -t tracelevel
Set trace/logging level: 6 = exceed, 5 = verbose (default), 4 = info, 3 = warning, 2 = error, 1 = fatal.
• mirror | fcpo | apps
Either back up the mirror (while the mirror is paused), the FirstClass post office (while the server is down), or the FirstClass application folder (by default, while the server is running). This is the only mandatory parameter.
• [destination]
The backup destination folder. This script attempts to create the full path if it does not exist, as long as it is on a local device. You can back up from the local machine to a remote RSYNC server. This is invoked when the destination path contains a :: separator or an rsync:// URL. The default folder is /Library/FirstClass Server/Backup.
We strongly recommend the use of an external volume as the backup destination.
The fcbackup.sh script can automatically back up all post offices or mirrored post offices in all available volumes. It automatically stops the server or pauses mirroring as required, and starts the server or continues mirroring after the backup has finished.
Here are some examples:
Command: fcbackup.sh -l /FCBackup/backup.log fcpo /FCBackup
Destination folder: /FCBackup
Backing up: primary post office (fcpo)
Rollover period: weekly (default)
Backup path: /FCBackup/<weekday>/<volumename>/<post office>
Example: /FCBackup/Tuesday/Master/fcpo
Command: fcbackup.sh -d fcpo /FCBackup
Destination folder: /FCBackup
Backing up: primary post office
Rollover period: daily
Backup path: /FCBackup/<volumename>/<post office>
Example: /FCBackup/Master/fcpo
Command: fcbackup.sh -t6 -l /FCBackup/backup.log mirror /FCBackup
Destination folder: /FCBackup
Backing up: mirrored post office
Rollover period: weekly (default)
Backup path: /FCBackup/<weekday>/<volumename>/<postofficemirror>
Example: /FCBackup/Tuesday/Mirror/fcpo8001
Command: fcbackup.sh -fm apps /FCBackup
Destination folder: /FCBackup
Backing up: Application folder while the FirstClass server is stopped (-f option)
Rollover period: monthly
Backup path: /FCBackup/<monthday>/<appsfolder>
Example: /FCBackup/Day21/FirstClass Server
Command: fcbackup.sh -l /tmp/backup.log mirror rsync://host/backup
Destination folder: /FCBackup
Backing up: mirrored post office to a remote RSYNC server
Rollover period: weekly (default)
Backup path: rsync://host/backup/<weekday>/<volumename>/<postofficemirror>
Example: rsync://host/backup/Tuesday/Mirror/fcpo8001
The fcbackuppo.sh and fcbackupmirror.sh scripts
The fcbackuppo.sh and fcbackupmirror.sh scripts have been preconfigured for Mac OS X as follows:
• the post office is located at /Library/FirstClass Server/Volumes/Master (POPATH)
• the mirrored post office is located at /Library/FirstClass Server/Volumes/Mirror (MIRRORPATH)
• the backup folder is located at /Library/FirstClass Server/Backup (BACKUPPATH)
• the backup log file is called /Library/FirstClass Server/Backup.log (BACKUPLOG).
The scripts contain some simple code to check if the post office or the mirrored post office and backup subfolders exist. If the backup destination does not exist, the script will attempt to create the folder. If the post office or the mirrored post office cannot be found or the backup destination cannot be created, the backup will fail.
You can modify these settings by editing the scripts in any text editor (for example: TextEdit or vi).
We strongly recommend you use an external volume as the backup destination.
Running the scripts
You need to run all scripts using the Mac OS X user fcadmin. If this fails, then the issue is likely permissions related. You should run fcfixvol, and ensure all work is done within the fcadmin account.
Although we do not recommend or require that you use "root" for the FirstClass server or Internet Services, you could run the scripts as root. On a Mac OS X client, you need to enable the root user first (on Mac OS X Server this user is enabled by default). This can be done with Netinfo Manager in the Applications/Utilities folder. Click the lock to allow changes to this form, then choose Security > Enable Root User. You will be prompted to set a password for the root user. Don't forget to click the lock again to prevent further changes.
To run the scripts, save the files to a convenient location. For example, for a Mac OS X system in /Library/FirstClass Server, open a Terminal application session and enter the following commands to back up the FirstClass mirror:
[machine-name:~] fcadmin% chmod +x /Library/FirstClass\ Server/fcbackup.sh
[machine-name:~] fcadmin% /Library/FirstClass\ Server/fcbackup.sh -t6 mirror
Sample script output:
10Feb04 11:16:17 - (Info) FirstClass Automated Backup 1.0-8 (Darwin) Started
10Feb04 11:16:17 - (Exceed) Skipping Post Office 'Master/fcpo': Mirror backup requested
10Feb04 11:16:17 - (Verbose) Pausing FirstClass Mirroring...
/usr/sbin/fcsctl pause: Pause mirror(s) signal sent to FirstClass Core Server (fcsd) process (7593).
10Feb04 11:16:17 - (Exceed) Waiting 600 seconds for command to complete...
10Feb04 11:26:17 - (Verbose) FirstClass Mirroring Paused
10Feb04 11:26:17 - (Info) Backing up Mirror 'Mirror/fcpo8001'
10Feb04 11:26:17 - (Verbose) Synchronizing Data...
10Feb04 11:26:18 - (Exceed) Attempting to create destination folder
10Feb04 11:26:18 - (Verbose) Preserving all file attributes
10Feb04 11:26:18 - (Verbose) Copying from: /Library/FirstClass Server/Volumes/Mirror/fcpo8001
10Feb04 11:26:18 - (Verbose) Copying to: /Library/FirstClass Server/Backup/Tuesday/Mirror
Number of files: 2563
Number of files transferred: 2362
Total file size: 42061286 bytes
Total transferred file size: 42061286 bytes
Literal data: 42061286 bytes
Matched data: 0 bytes
File list size: 29515
Total bytes written: 42197961
Total bytes read: 47260
wrote 42197961 bytes read 47260 bytes 722140.53 bytes/sec
total size is 42061286 speedup is 1.00
10Feb04 11:27:16 - (Verbose) Data Synchronized in 0:00:59
10Feb04 11:27:16 - (Verbose) Continuing FirstClass Mirroring...
/usr/sbin/fcsctl continue: Continue mirror(s) signal sent to FirstClass Core Server (fcsd) process (7593).
10Feb04 11:27:17 - (Exceed) Waiting 5 seconds for command to complete...
10Feb04 11:27:22 - (Verbose) FirstClass Mirroring Continued
10Feb04 11:27:22 - (Info) FirstClass Automated Backup 1.0-8 (Darwin) Finished
[machine-name:~] fcadmin%
The chmod command makes the scripts executable. This command only needs to be executed once.
Initiating a backup
To initiate a backup to a remote RSYNC server with IP address 172.31.1.156, the command looks like this:
[machine-name:~] fcadmin% /Library/FirstClass\ Server/fcbackup.sh -t6 fcpo rsync://172.31.1.156/backup
Alternatively, you can start the script as a parameter to the Bourne Shell:
[machine-name:~] fcadmin% /bin/sh -c "/Library/FirstClass\ Server/fcbackup.sh mirror"
Sample script output:
10Feb04 11:31:27 - (Info) FirstClass Automated Backup 1.0-8 (Darwin) Started
10Feb04 11:31:27 - (Verbose) Stopping FirstClass Core Server...
/usr/sbin/fcsctl stop: FirstClass Core Server (fcsd) stopped (7807).
fcsd: Signal received - SIGTERM (fast shutdown).
10Feb04 11:31:27 - (Exceed) Waiting 30 seconds for command to complete...
10Feb04 11:31:57 - (Verbose) FirstClass Core Server Stopped
10Feb04 11:31:57 - (Info) Backing up Post Office 'Master/fcpo'
10Feb04 11:31:57 - (Verbose) Synchronizing Data...
10Feb04 11:31:58 - (Warning) Connecting to remote rsync server
10Feb04 11:31:58 - (Verbose) Preserving all file attributes
10Feb04 11:31:58 - (Verbose) Copying from: /Library/FirstClass Server/Volumes/Master/fcpo
10Feb04 11:31:58 - (Verbose) Copying to: rsync://172.31.1.156/backup/Tuesday/Master
Number of files: 2575
Number of files transferred: 2374
Total file size: 42133536 bytes
Total transferred file size: 42133536 bytes
Literal data: 42133536 bytes
Matched data: 0 bytes
File list size: 29239
Total bytes written: 42261033
Total bytes read: 38024
wrote 42261033 bytes read 38024 bytes 4976359.65 bytes/sec
total size is 42133536 speedup is 1.00
10Feb04 11:32:07 - (Verbose) Data Synchronized in 0:00:08
10Feb04 11:32:07 - (Exceed) Skipping Mirror 'Mirror/fcpo8001': Post Office backup requested
10Feb04 11:32:07 - (Verbose) Starting FirstClass Core Server...
Falling back to user 'fcadmin' (502).
/Library/FirstClass Server/./fcsd.rez: OK
FirstClass Server now running as daemon process 7863.
Server was started as user 'root' (0) in group 'staff' (20).
Server now running as user 'fcadmin' (502) in group 'admin' (80).
fcsd: Operating system last booted: Mon Feb 9 09:15:58 2004
fcsd: Number of processors installed: 1
fcsd: System open file limit: 30000 files
fcsd: System open file (VNODE) limit: 30000 vnodes
fcsd: Server open file limit: 30000 files
fcsd: This server is configured for 15 network sessions.
Created 10 OS worker threads.
fcsd: FirstClass Server 7.1 (Build 135) started.
/usr/sbin/fcsctl start: FirstClass Core Server (fcsd) started (7863).
10Feb04 11:32:12 - (Exceed) Waiting 5 seconds for command to complete...
10Feb04 11:32:17 - (Verbose) FirstClass Core Server Started
10Feb04 11:32:17 - (Info) FirstClass Automated Backup 1.0-8 (Darwin) Finished
[machine-name:~] fcadmin%
Scheduled backups
The scripts can be scheduled using the crontab utility. You can create a text file (called a crontab file), enter the time and frequency that you want to run the script, and pass it to the cron process. A crontab file consists of lines of six fields each. The fields are separated by spaces or tabs. The first five are integer patterns that specify the following:
• minute (0-59)
• hour (0-23)
• day of the month (1-31)
• month of the year (1-12)
• day of the week (0-6 with 0=Sunday).
Each of these patterns may be either an asterisk (*), meaning all legal values, or a list of elements separated by commas (,). An element is one or two numbers separated by a minus sign (-), meaning an inclusive range.
You can specify days using two fields (day of the month and day of the week). If both are specified, both are adhered to.
The sixth field of a line in a crontab file is a string that is executed by the Shell at the specified times. A percent character in this field (unless escaped by \) is translated to a NEWLINE character.
Only the first line (up to a "%" or end of line) of the command field is executed by the Shell. Other lines are made available to the command as standard input. Any line beginning with a "#" is a comment and will be ignored. The file should not contain blank lines.
For example, create a file called cronjobs.txt containing the following three lines:
5 0 * * 0 /bin/sh -c "/Library/FirstClass\ Server/fcbackup.sh -l /tmp/backup.log -m apps"
15 0 * * 1-5 /bin/sh -c "/Library/FirstClass\ Server/fcbackup.sh -l /tmp/backup.log mirror"
0 5 * * 0,6 /bin/sh -c "/Library/FirstClass\ Server/fcbackup.sh -l /tmp/backup.log mirror"
These scripts will back up the FirstClass post office mirror every weekday morning at 1:15am and at 5:00am on Saturday and Sunday (as in the example cronjobs-rsync-backup.txt), using a weekly rollover period and the default backup destination. It will also back up the FirstClass Applications folder every Sunday at five past midnight, using a monthly rollover period. The output is redirected to a file.
Alternatively, you can use the crontab utility to schedule a backup window (as in the example cronjobs-external-backup.txt) using these scripts:
10 0 * * 1-5 /bin/sh -c "/Library/FirstClass\ Server/stopmirror.sh"
10 2 * * 1-5 /bin/sh -c "/Library/FirstClass\ Server/startmirror.sh"
Here, mirroring is paused every working day at 12:10am and resynchronized at 2:10am.
To schedule these jobs, open a Terminal application session and enter the following commands:
[machine-name:~] fcadmin% crontab /Library/FirstClass\ Server/cronjobs-rsync-backup.txt
[machine-name:~] fcadmin%
You can use the following command to check if your cronjobs have been loaded properly:
[machine-name:~] fcadmin% crontab -l
0 0 * * 0 /bin/sh -c "/Library/FirstClass\ Server/fcbackup.sh -l /tmp/backup.log -m apps"
15 0 * * 1-5 /bin/sh -c "/Library/FirstClass\ Server/fcbackup.sh -l /tmp/backup.log mirror"
0 5 * * 0,6 /bin/sh -c "/Library/FirstClass\ Server/fcbackup.sh -l /tmp/backup.log mirror"
[machine-name:~] fcadmin%
These jobs remain scheduled even if you reboot your system. To remove them, use the command crontab -r. All you have to do is check the /tmp/backup.log file regularly for errors.
Restoring data from backups
In case of a total system crash, it is recommended that you reinstall the FirstClass server in order to restore Desktop icons and the automatic startup scripts, and then restore the FirstClass Applications folder from your most recent backup, followed by a restoration of the post office.
For further information, please refer to the "Restoring your Post Office" section in the FirstClass Administrator's Guide.
Appendix: Configuring your system to run an RSYNC server
Before you attempt this, you must be confident using the Terminal application and a plain-text editor like vi. Mistakes might require you to reinstall the operating system.
An alternative to using shared folders is to configure an RSYNC server on a remote machine. This can be another Mac OS X system, or any Linux server. Most Linux servers have RSYNC server already enabled.
The version of RSYNC (2.5.7) that is installed on Mac OS X 10.2.8 or earlier does not work properly. If you have this version, you need to download the latest version of RSYNC from http://samba.anu.edu.au/rsync/, compile the software (there is no binary distribution for Mac OS X available) and install it. To compile source code on your Mac OS, install the development supplement from the Mac OS X CD-ROM. The RSYNC version at the moment of writing is 2.6.0. For detailed instructions, see the documentation provided with the RSYNC source code.
To enable RSYNC server on a Mac OS X system, you will have to go through the following steps:
1 Configure system files for RSYNC to run as a server.
2 Create a folder for the automated backups.
3 Create an rsyncd.conf file.
Make sure TCP port 873 is enabled on the internal (software) firewall. This port is used to connect to the RSYNC server. You can find the Mac OS X firewall configuration in System Preferences/Internet.
Automated RSYNC server configuration
To simplify the configuration process, we have supplied the fcbackupinit.sh script. This is an initialization script, to be used in conjunction with the fcbackup.sh script. The fcbackupinit.sh script needs to be run once on the remote server (the server running the RSYNC server process). It can be run again later, if additional backup areas need to be configured on the same server. The script is interactive and will perform the following tasks (provided that RSYNC is available):
• ask the user for the relevant information to populate /etc/rsyncd.conf
• create the /etc/rsyncd.conf file, if it does not already exist
If the file does exist, this task gives the user the option to add a module, or to overwrite the entire file.
• configure the RSYNC service in /etc/services, if it is not already there
• configure the RSYNC service either in /etc/inetd.conf or in /etc/xinetd.d, depending on the currently running "Internet Services Daemon" (inetd or xinetd), if necessary
• create the physical folder (the RSYNC module path) and also create the appropriate folders for the selected backup rollover period
• force inetd or xinetd to reload the configuration
• test the RSYNC server.
The script needs to have root privileges, so you need to begin with sudo:
sudo ./fcbackupinit.sh
The script accepts the following options:
• -i
Interactively configure and initialize RSYNC server settings (default).
• -m
Create folders for a monthly backup rollover.
• -w
Create folders for a weekly backup rollover.
• [destination]
Location of new folders (optional, not valid with -i option).
Before you start the script, be prepared to answer the following prompts, which will populate a new /etc/rsyncd.conf file:
• User name used for transfers
When you copy files to a remote machine with RSYNC, the remote actions will be performed with specific user privileges. You need to provide an existing Mac OS X user name for this (default is "fcadmin"). The script checks if the entered user name exists.
• Group name used for transfers
The same applies for the group. You need to provide an existing group name (default is "admin"). The script checks if the entered group name exists.
• Module name
Each module exports a folder tree as a symbolic name. This is the module name (default name is "backup"). The script checks if the entered name is unique.
• Module comment
This field specifies a description string that is displayed next to the module name when RSYNC clients obtain a list of available modules. The default is FirstClass Automated Backup Area.
• Module path
This specifies the folder in the server's file system to make available in this module. The default is /Users/<userid>/Backup, where <userid> is a Mac OS X user ID.
• Log file name
This is a global setting that tells RSYNC server where to log messages to. The default is <module path>/rsync.log, where <module path> is the path specified in the previous point. Any additional modules created later will write messages to the same log file.
• Allowed host names
This option allows you to specify a list of patterns (separated by spaces) that are matched against a connecting client's host name and IP address. If none of the patterns match, the connection is rejected. The default is 127.0.0.1.
• Enable weekly backup rollover
If this option is selected, the script will create the necessary folders (day of the week) in the "module path" folder.
• Enable monthly backup rollover
If this option is selected, the script will create the necessary folders (Day01, Day02... Day31) in the "module path" folder.
Sample script output:
[machine-name:~] fcadmin% sudo ./fcbackupinit.sh
Password:
Configuration data for rsync server [press Return to accept default]
--------------------------------------------------------------------
User name used for transfers [fcadmin]: wdejong
Group name used for transfers [admin]:
Module name [backup]:
Module comment [FirstClass Automated Backup Area]:
Module path [/Users/wdejong/Backup]:
Log file name [/Users/wdejong/Backup/rsync.log]:
Allowed host names [127.0.0.1]:
Enable weekly backup rollover (y/n) [n]: y
Enable monthly backup rollover (y/n) [n]: y
Verify configuration data for rsync server
------------------------------------------
User name used for transfers : wdejong
Group name used for transfers : admin
Module name : backup
Module comment : FirstClass Automated Backup Area
Module path : /Users/wdejong/Backup
Log file name : /Users/wdejong/Backup/rsync.log
Allowed host names : 127.0.0.1
Enable weekly backup rollover : y
Enable monthly backup rollover : y
Is this correct (y/n/q) [n]? y
Checking for super user privileges ... ok.
Verifying rsync availability ... ok (found at /usr/bin/rsync).
Creating rsync configuration file ... ok.
Adding rsync server to known services ... ok.
Checking Internet Services Daemon ... ok (inetd running with pid 319).
Installing rsync server for inetd ... ok.
Reconfiguring Internet Services Daemon ... ok.
Checking for listen on TCP port 873 ... ok.
Creating monthly rollover folders ... ok.
Setting UID and GID for monthly folders ... ok.
Creating weekly rollover folders ... ok.
Setting UID and GID for weekly folders ... ok.
Verifying rsync server configuration ... ok.
Result of "rsync rsync://localhost/":
backup FirstClass Automated Backup Area
[machine-name:~] fcadmin%
If the RSYNC configuration file exists, the script will provide you with the options described with the sample script below.
Sample script output:
The rsync server configuration file (/etc/rsyncd.conf) already exists.
Currently defined rsync modules:
backup FirstClass Automated Backup Area
How would you like to proceed?
1. Add a new rsync module to the existing file.
2. Overwrite the existing file (delete current settings).
3. Edit the existing file with "vi" (modify manually).
4. Continue without further modifications.
5. Quit.
Your choice [1]:
• Add a new RSYNC module to the existing file
This is the default option, which will allow you to add a new module to the file, creating a new backup area for the fcbackup.sh script. You will be prompted for the module information as explained above, with the exception of the log file name, because that is a global setting.
• Overwrite the existing file (delete current settings)
This discards the existing configuration and creates a new file. You will be prompted for the module information as explained above.
• Edit the existing file with "vi" (modify manually)
This opens the configuration file (/etc/rsyncd.conf) in the vi text editor for manual modification. Enter <ESC>:q!<ENTER> to quit the editor without saving.
• Continue without further modifications
This leaves the configuration file in its current state and continues checking the RSYNC server setup.
• Quit
Exits the script without making any modifications.
Manual RSYNC server configuration
If you want to configure the RSYNC server manually, follow these steps:
1 Configure system files for RSYNC to run as a server.
2 Create a folder for the automated backups.
3 Create an rsyncd.conf file.
STEP 1: Configure system files for RSYNC to run as a server
To enable RSYNC to run as a server, you need to modify two files. You need administrator access (we assume you are using root user access, or using the sudo command) to modify them. We also assume that "/usr/bin/RSYNC" is the path where you have RSYNC installed on your system.
If your system is running the inetd Internet Services Daemon (Mac OS X 10.2.x), add the following line to /etc/inetd.conf:
rsync stream tcp nowait root /usr/bin/rsync rsyncd --daemon
If your system is running the xinetd Internet Services Daemon (Mac OS X 10.3.x), you need to create the text file /etc/xinetd.d/rsync with the following content:
service rsync
{
disable = no
socket_type = stream
wait = no
user = root
server = /usr/bin/rsync
server_args = --daemon
log_on_failure += USERID
}
Next, add the following line to /etc/services:
rsync 873/tcp
After you have modified the files and the firewall, you have to tell the Internet "super-server" (inetd for Mac OS X 10.2.x and xinetd for Mac OS X 10.3.x) to reload its configuration files. You can do this from the Terminal application:
[machine-name:~] fcadmin% ps -ax | grep inetd
418 ?? Ss 0:00.02 inetd
3040 std R+ 0:00.00 grep inetd
[machine-name:~] fcadmin% sudo kill -1 418
Password:
[machine-name:~] fcadmin%
Your system is now ready to receive connection requests to RSYNC.
STEP 2: Create a folder for the automated backups
The next step is to create a folder on your system that you want to make available to RSYNC. For example, this could be a folder called Backup in the /Users/fcadmin folder, assuming you have a user called fcadmin on your system. It's a good idea to determine this user's user ID and group ID now. We will use this information in our last step, the creation of the rsyncd.conf file. You can get this information by executing a command like the following example command from the Terminal application:
[machine-name:~] fcadmin% id
uid=502(fcadmin) gid=20(staff) groups=20(staff), 80(admin)
[machine-name:~] fcadmin%
In the above example, the user ID is 502 and the group ID is 20.
STEP 3: Create an rsyncd.conf file
The rsyncd.conf file needs to be created in the /etc folder (using admin-level access). You need to use a text-only editor, like vi. The contents of the file look similar to this:
use chroot = yes
log file = /Users/fcadmin/FCBackup/rsync.log
uid = fcadmin
gid = admin
[backup]
path = /Users/fcadmin/FCBackup
comment = FirstClass Automated Backup Area
read only = false
hosts allow = 172.31.1.156
This file will create an RSYNC module called backup. A log file is maintained and all access will be performed with user ID "fcadmin" and group ID "admin". Only the machine with IP address 172.31.1.156 is allowed to connect to this module. After the file is saved and closed, you can connect to this server with the following command:
[machine-name:~] fcadmin% rsync hostname::
backup FirstClass Automated Backup Area
[machine-name:~] fcadmin%
The output is the module name, followed by the comment as defined in the rsyncd.conf file. Next, you need to create the appropriate folder structure manually on your RSYNC server, since fcbackup.sh cannot create these folders automatically.
For weekly backup periods, create one folder for each day of the week (named Monday, Tuesday, and so on). For monthly backup periods, create one folder for each day of the month (named Day01, Day02, and so on).
The folder names are case sensitive and need to be created inside the backup folder specified in the rsyncd.conf file, which in our example is /Users/fcadmin/FCBackup.
That was the last step that needed to be completed. Now you can start the backup script as follows:
[machine-name:~] fcadmin% ./fcbackup.sh apps hostname::backup
or you can use an alternative syntax for the destination, which is the rsync:// URL syntax:
[machine-name:~] fcadmin% ./fcbackup.sh apps rsync://hostname/backup
Sample script output:
09Feb04 16:36:11 - (Info) FirstClass Automated Backup 1.0-8 (Darwin) Started
09Feb04 16:36:11 - (Info) Backing up FirstClass Application folder '/Library/FirstClass Server'
09Feb04 16:36:11 - (Verbose) Synchronizing Data...
09Feb04 16:36:12 - (Warning) Connecting to remote rsync server
09Feb04 16:36:12 - (Verbose) Preserving all file attributes
09Feb04 16:36:12 - (Verbose) Copying from: /Library/FirstClass Server
09Feb04 16:36:12 - (Verbose) Copying to: hostname::backup/Monday
09Feb04 16:36:12 - (Verbose) Excluding: Volumes/
Number of files: 156
Number of files transferred: 142
Total file size: 18641453 bytes
Total transferred file size: 18641453 bytes
Literal data: 18641453 bytes
Matched data: 0 bytes
File list size: 3450
Total bytes written: 18652855
Total bytes read: 2312
wrote 18652855 bytes read 2312 bytes 7462066.80 bytes/sec
total size is 18641453 speedup is 1.00
09Feb04 16:36:14 - (Verbose) Data Synchronized in 0:00:03
09Feb04 16:36:14 - (Info) FirstClass Automated Backup 1.0-8 (Darwin) Finished
[machine-name:~] fcadmin%
Certain features mentioned here may not yet be released, and may not be currently available in all geographic regions. Open Text Corporation reserves the right to modify or cancel any features mentioned here.
Here are some of the topics we are working on for future issues:
• FirstClass 8.0 features
Introduction of various 8.0 features that are coming soon.
• Red Deer case study
An award-winning FirstClass web site and the system behind it.
• Ideas for end users
Ideas for you and your users to help you get the most out of FirstClass.
• Redesigning your system
Batch scripts to help you change your Desktop background picture, bookmarks, home page folder, and more.
Share your thoughts and ideas
Do you have additional knowledge to share? New information or handy tricks to reveal? Please send them to us. In addition, send us questions you want answered by developers and technical staff, suggestions for articles and content, queries about how to perform tasks that may make your job easier, and general comments about our newsletter.
Site visits
The Information Development team conducts site visits to gain feedback from administrators and users of FirstClass. Previous visits have proved successful, and were found to be mutually beneficial. If you would like to schedule a site visit at your company, send us an email (currently in the Greater Toronto area only*).
*If you are outside of the Greater Toronto Area, we can organize a teleconference so you can still take advantage of the benefits these meetings provide.
Please send all correspondence to the TechNewsMail conference (TechNewsMail@firstclass.com).
Editors: Ann Schwartz, Annette Ferron
TechNewsMail@firstclass.com (TechNewsMail conference)
sales@firstclass.com (Sales)
support@firstclass.com (FirstClass Customer Support)
Please send all correspondence to the TechNewsMail conference (TechNewsMail@firstclass.com).
Main number: 905.762.6000
Main fax number: 905.762.6151
Toll-free number: 1.888.808.0388
Our address is:
Open Text Corporation
FirstClass Division
38 Leek Crescent
Richmond Hill, ON
Canada, L4B 4N8
Documentation
Looking for new documentation? Existing documentation? Check out Documentation on our web site.
Check our online help for copies of the documentation that correspond to your server version.
Training
The Richmond Hill office holds customized training courses throughout the year. For a training schedule or course descriptions, including prerequisites, see Training on our web site. If you have any questions, please address them to FirstClass Training or training@firstclass.com.
Previous newsletters can be found at Welcome to The FirstClass Newsletter on our web site.
We want this newsletter to reach all of the people in your organization who will directly benefit from it. If you would like to subscribe anybody else to this newsletter, please provide us with their email address or FirstClass account. Enter SUBSCRIBE as the subject line.
If you would like to unsubscribe from this newsletter, send us an email with the subject line UNSUBSCRIBE.
Please send all correspondence to the TechNewsMail conference (TechNewsMail@firstclass.com).
Information in this document is subject to change without notice. Certain features and products described in this document may not yet be released, and may not be currently available in all geographic regions.
All rights reserved. FirstClass, Centrinity, Livelink, Open Text and other trademarks and the associated logos used herein are trademarks of Open Text Corporation and/or its subsidiary used under license. All other trademarks are property of their respective owners.
This document is bound by international copyright law and the FirstClass Software License Agreement and Limited Warranty included with every FirstClass product.
Copyright 2004 by Open Text Corporation.
|

