| |
|
Vol 2, Issue 1
July 2002
You need FirstClass 6 or higher to use the links in this document. If you haven't upgraded to FirstClass 6 or higher yet, you can still access the content simply by scrolling up and down within the document, or viewing the fully formatted document on our website The FirstClass Newsletter, Vol 2 Issue 1. Links to downloads mentioned in this newsletter and archives can also be found here. To link to a section, click the associated icon. To view an image,
double-click on it to enlarge it.
To coincide with the upcoming FirstClass 7.0 product release, this issue focuses on some of the new FirstClass client, server, and Internet Services features including:
• new calendaring options
• printing enhancements
• multitenant support
• FirstClass Connector for Microsoft Exchange
• outbound mail (SMTP) Internet Services clustering.
Centrinity now offers a variety of customized training courses throughout the year. You can find information and instructions about how to sign up in Resources.
Name Our Newsletter Contest -THE WINNERS!
The powers that be have decided that the name of our newsletter will be "The FirstClass Newsletter". This name was not submitted by anyone outside of Centrinity, so there is no first place winner. However, we would like to thank those FirstClass administrators who sent in their submissions, and award them accordingly, so ...
The first runner-up, and the winner of a Centrinity t-shirt and ball cap, is John S. Hansen
from MikroGraf in Denmark with "First2Know".
The second runner-up, and the winner of a Centrinity t-shirt, is William Steed from
Orbit Online, with "Centrinitips".
The third runner-up, and the winner of a Centrinity ball cap, is Jim Hendry
from Lester B. Pearson School Board with "The Full Spectrum Newsletter".
Congratulations to all of you! Please send an email to the TechNewsMail conference (TechNewsMail@centrinity.com) and provide your mailing addresses.
New Subscribers
Just subscribed to our newsletter? Haven't seen the first issue yet? Just go to the Archives section of this newsletter for a link to any back issues of the Centrinity Technical Newsletter.
Please send all correspondence to the TechNewsMail conference (TechNewsMail@centrinity.com).
Upgrade checklist for FirstClass 7.0
Password Helper
What to look for in future issues of the Centrinity Technical Newsletter
Other languages? Provide feedback? Questions? Topic ideas?
New training courses and where to find documentation
Where to find previous newsletter issues
Subscribe other members of your organization
This article discusses some of the new features in the FirstClass server, client, and Internet Services. You can find out more about these features in the FirstClass 7.0 documentation, including our online help.
New in the FirstClass Server
Two of the new FirstClass 7.0 server features are:
• the ability to synchronize information between FirstClass and Microsoft Exchange
• the ability to create a hierarchical structure for user groups by using organizational units.
FirstClass Connector for Microsoft Exchange Server
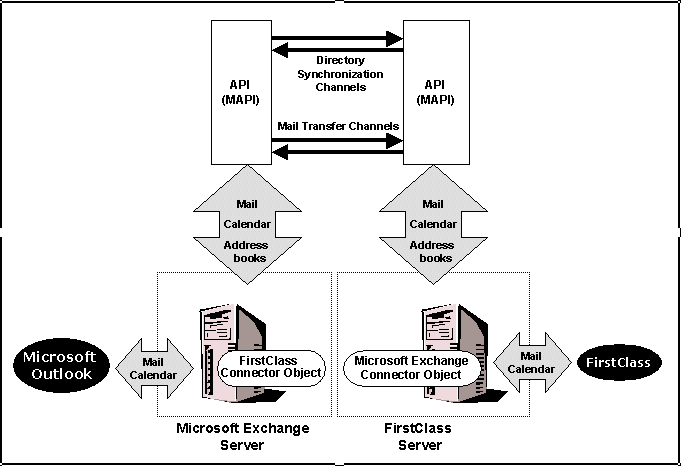
The FirstClass® Connector for Microsoft® Exchange Server (FirstClass Connector) is a transport mechanism for real-time communication between the FirstClass server (minimum version 7.0) and Microsoft® Exchange Server 5.5. It translates messages and user information into a readable format as they are transported to another server, and maintains Directory synchronization between the two servers.
Because the information transfer is performed in real time, the need for intermediate storage is eliminated. The connection to Microsoft Exchange Server is implemented using MAPI for mail and calendaring, and using ADSI for Directory synchronization. The connection to FirstClass is implemented using FCP/Internet Client for mail and calendaring, and using FirstClass batch administration for Directory synchronization.
Organizational Unit Support
An organizational unit (OU) is, quite simply, just another way to use user groups to organize your system for easier identification of users and/or to allow duplicate Directory entries (user names, conferences, or calendars). OUs are not required in setting up your FirstClass system, but can play an important role in organization and security, especially in complex FirstClass systems with many users.
Do not assign OUs to standard groups.
When configuring your system from the administrator’s Desktop, OUs are defined on the Group Privileges form:
Some points to note about OUs are:
• OUs are set at different levels, but the OU does not determine the hierarchical role of the members
• a user can be a member of several OUs
• the most user-specific OU is the user’s Primary OU
• the Primary OU can be (but does not need to be) a member of a larger OU, like an umbrella structure
• OUs classify groups of users according to their roles in the organization, not according to their levels.
A user's privileges and permissions are not inherited from one OU to another. You must specifically assign the user to each group in the proper order on the User Information form.
Example
For example, Husky Planes has the following divisions within its organization:
• Employees
• Management
• IT
• Finance
• Customers.
Management, IT, and Finance are distinct departments within the company and each user belongs to one of them. Therefore, these groups will all be given the OU level of Department. The Customers group also fits this model since its members use Husky Planes’ FirstClass system and communicate with some Husky Planes employees. Therefore we will also give the Customers group the OU level of Department. Even though we decided that Employees was a logical division in the company, we still haven’t given the employees group an OU level. Since this group contains most, but not all, of Husky Planes’s users and it contains members of other OUs (some, but not all the departments - customers are not employees, but they are a department on our system), we will choose the OU level of Company.
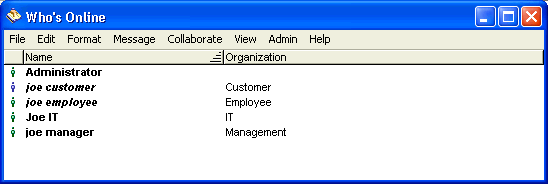
When you view the Directory, the user’s Primary OU is displayed. A user viewing the Directory, or Who’s Online, can easily determine what department another user is in.
In this example, Joe Employee is not a member of any specific department so his Primary OU is Employee. Although Joe Manager and Joe IT are both employees (and members of the Employees OU), their Primary OUs are listed.
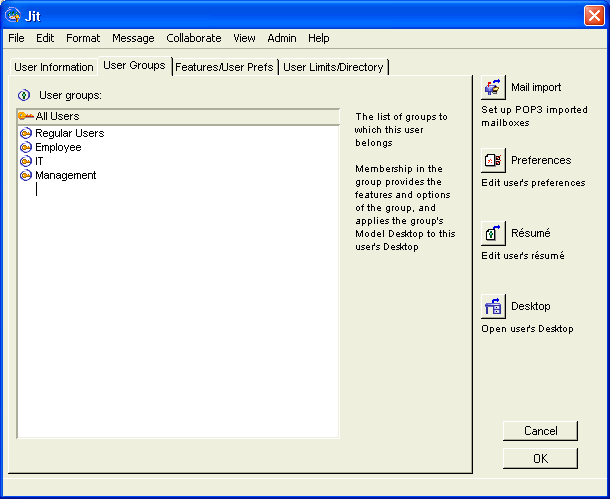
If a user belongs to two Primary OUs (Management and Finance, for instance), the one listed closer to the top of the user groups list on the user’s User Information form will be the one that is displayed. In the following example, Joe IT is also a manager and is a member of the Management OU:
In the Directory, Joe IT will be listed as IT, not Management.
Conferences in OUs
Conferences and conference groups created by the administrator on the administrator’s Desktop do not belong to an OU. However, administrators can set the conference or conference group OU using the batch administration SETOU command. For information, see our online help.
The user inherits the OU of his Primary OU. If you have given your users permission to create conferences, any conference a user creates will inherit the user’s Primary OU.
OUs and Duplicate Directory Entries
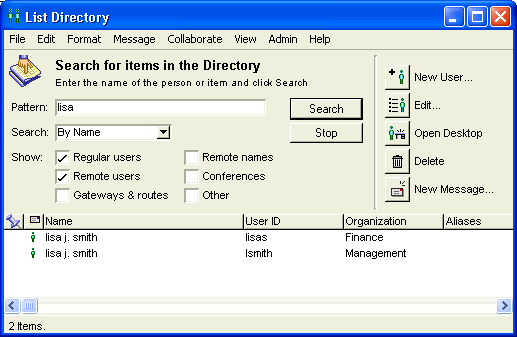
As stated earlier, OUs allow you to have multiple Directory entries. If you select "Require unique names within this organizational unit", you can have two people with the exact same name in the Directory as long as they are in separate OUs. For instance, if you have a Lisa J. Smith in Management, you can also have a Lisa J. Smith in Finance. When you list the search for Lisa J. Smith in the Directory, you will see the following:
You cannot have duplicate names within the same OU. If Lisa J. Smith is promoted from Finance to Management, you will have to change her name in the Directory (Lisa Julie Smith, for instance).
You can never have duplicate user IDs.
Multitenant Configurations
FirstClass offers the scalability and reliability that makes it ideally suited to support multiple tenants on one server. When you host multiple organizations on one FirstClass system, you want each organization to appear to be the only tenant. The 7.0 release offers the following features to support multiple tenants:
User Groups
Tenants can be managed through OUs, which can be used to control:
• what features the users can access
• the access to collaborative conferences unique to the tenant.
When a tenant modifies its feature set, the new features can be enabled easily through the OU's Group Privileges form.
Directory Filtering
Allows each tenant to see only the Directory items (users, conferences, global mail lists, or calendars) that pertain to their organization. For a full example of effectively using Directory filtering in a multitenant environment, see FirstClass Administrator's Guide.
Unique Names Within Each Organization
Each tenant can choose any name for users, conferences, or calendars, even if another tenant already uses that name. For example, each tenant can have a conference called Announcements, a calendar called Staff Vacations, and a user account called Reception. However, within each organization the names must be unique.
Outgoing Mail Set at a Group Level
Each tenant's outgoing Internet mail can be assigned a different domain name.
Creating Own Conferences or Calendars by Tenants
When tenants create their own conferences or calendars, these objects are automatically placed in the OU of the creator. This feature allows the correct OU to appear in the Directory and preserves Directory filtering rules. In addition, administrators adding objects using batch admin can set the object's OU using the new SETOU command.
Administrating a Multitenant System
In 7.0, administration is done centrally; tenants cannot perform any administrative functions. The administrator can set up custom forms for the tenant to request additions and modifications, but the administrator has to execute these requests. Batch administration can be used to automate tenant requests and will reduce the execution time to seconds, to ensure the procedure is done according to specifications.
Scalability is also provided by the ability to cluster additional Internet Services and Voice Services modules.
New in FirstClass Internet Services
For more information on these and other Internet Services features, see FirstClass Internet Services Administrator's Guide.
Two of the new features in Internet Services 7.0 are:
• dedicating a clustered service for your system's outbound mail (SMTP) and binding specific user groups to this service
• specifying how you would like your users to receive inbound HTML messages.
Clustering by Protocol
You can dedicate a clustered service to route all outbound mail (SMTP) on your system and, if desired, bind certain user groups to this service. This is useful if you have a large site with heavy SMTP traffic and want to have all mail (or certain group mail) routed through one Internet Services.
Think of dedicating one Internet Services cluster to one protocol as similar to having a dedicated Internet phone line in your house. Your regular phone line is used only for incoming and outgoing calls, whereas your Internet phone line is only used for logging onto the web.
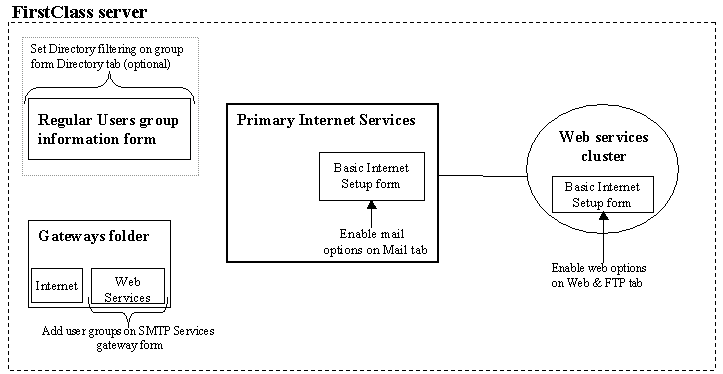
The diagram below shows the different areas and forms on your system that you must configure to have a dedicated SMTP service cluster for outgoing mail:
Example
On Husky Planes, we decided to dedicate the primary Internet Services to route all outbound mail (SMTP) and create an HTTP clustered service to route all web and FTP traffic. By doing this, we will create a more efficient system for handling both outbound mail and web traffic. To accomplish this setup, the FirstClass administrator uses Internet Services clustering as follows:
All field name entries are for example purposes only.
1 Create a new clustered service, following the steps in chapter 8 "Clustering Internet Services to plan your system" in FirstClass Internet Services Administrator's Guide.
In this example, we named the clustered service Web Services.
2 Open the Web Services Config folder in the Clustered Services folder on the administrator’s Desktop.
3 Double-click the Basic Internet Setup form.
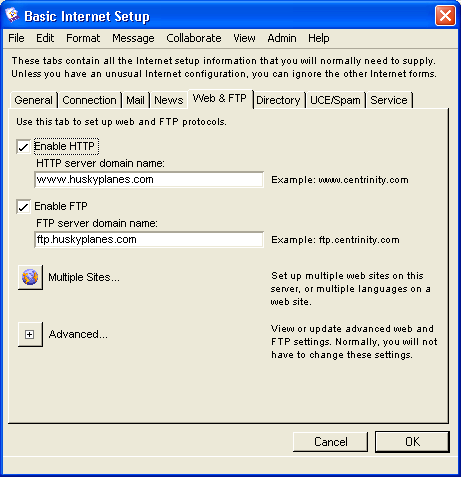
4 Select both "Enable HTTP" and "Enable FTP" and fill in "HTTP server domain name", and "FTP server domain name" on the Web & FTP tab:
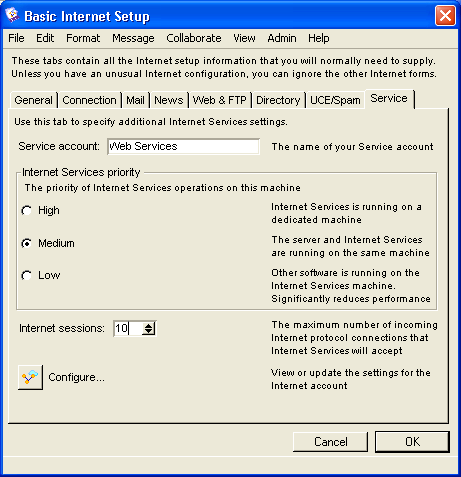
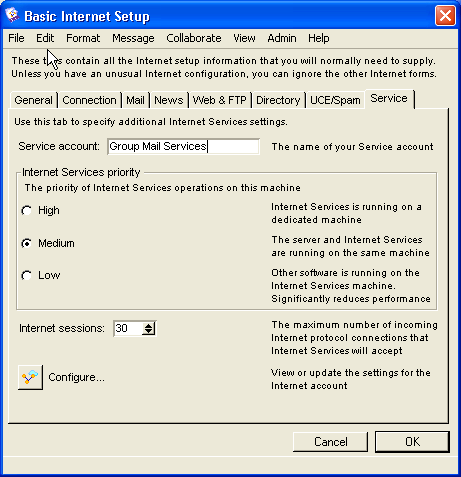
5 Enter the gateway name in "Service account" on the Service tab:
6 Clear "Enable SMTP" and make sure "SMTP server domain name" is empty, on the Mail tab.
7 Click OK.
8 in the primary Internet Services folder
Double-click the Basic Internet Setup form.
9 Clear all fields on the Web & FTP tab.
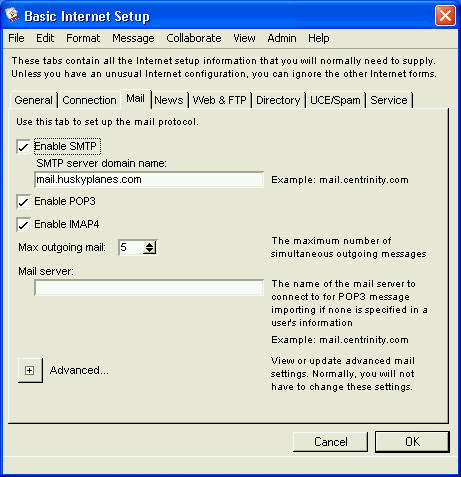
10 Select "Enable SMTP", "Enable POP3", and "Enable IMAP4" and fill in "SMTP server domain name" on the Mail tab:
11 Click OK.
Note
Make sure your POP3 and IMAP4 users have the correct server domain name (for example, mail.huskyplanes.com) configured in their POP3 or IMAP4 clients.
Now all outbound mail is routed through the primary Internet Services and all web traffic is routed through the web clustered service.
Binding the SMTP Services Cluster to Specific Groups
You can balance your system’s load even more by binding one or more user groups to a clustered service. For example, you could have all mail for certain user groups route through one clustered service and the mail for the rest of your employees route through another clustered service.
On Husky Planes, we decided to route SMTP mail for the Management, Sales, and Marketing groups through a separate SMTP clustered service and have all other employee mail continue to route through the primary Internet Services. To accomplish this setup, the FirstClass administrator uses Internet Services clustering as follows:
All field name entries are for example purposes only.
If SMTP is enabled on two or more clusters for different groups, you must define these groups on each cluster’s gateway form.
1 Create a new clustered service, following the steps in chapter 8 "Clustering Internet Services to plan your system" in FirstClass Internet Services Administrator's Guide.
In this example, we named the clustered service Group Mail Services.
2 Open the Group Mail Services Config folder in the Clustered Services folder on the administrator’s Desktop.
3 Double-click the Basic Internet Setup form.
4 Select "Enable SMTP", "Enable POP3", and "Enable IMAP4".
5 Fill in both "SMTP server domain name" and "Mail server" (if applicable), on the Mail tab:
6 Clear "Enable HTTP" and "Enable FTP" on the Web & FTP tab.
7 Enter your Service name in "Service account" on the Service tab:
8 Click OK.
At this point, you must configure the primary Internet Services (for all other employee mail) and the gateway forms:
1 Open the primary Internet Services folder on the administrator's Desktop.
2 Double-click the primary Internet Services Basic Internet Setup form.
3 Select "Enable SMTP", "Enable POP3", and "Enable IMAP4" on the Mail tab.
4 Enter your information in "SMTP server domain name" and "Mail server" (if applicable).
Important
We recommend that you leave SMTP enabled on your primary Internet Services, as any messages already delivered into the server through the primary Internet Services are already tagged for that gateway and all replies will attempt to send mail out through this same gateway. If you turn off SMTP in this primary gateway, these outbound replies will sit indefinitely in the Internet Services Mailbox.
5 Click OK.
6 Open the Gateways folder.
7 Open the Group Mail Services gateway form.
8 Enter "Group Mail Services" in "Service name" on the Main tab.
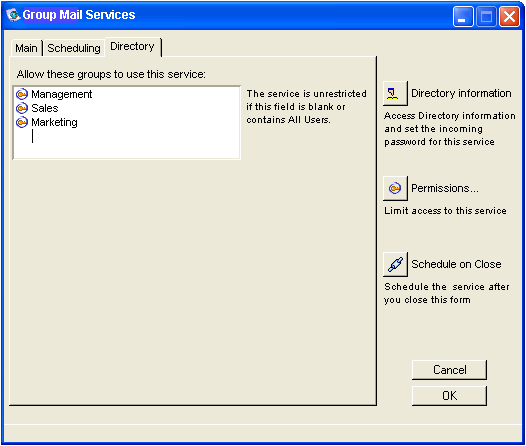
9 Enter the user groups to which you want to limit this service (in the example, the user groups are: Management, Sales, Marketing) in "Allow these groups to use this service" on the Directory tab:
10 Click OK.
11 Open the primary Internet Services gateway form.
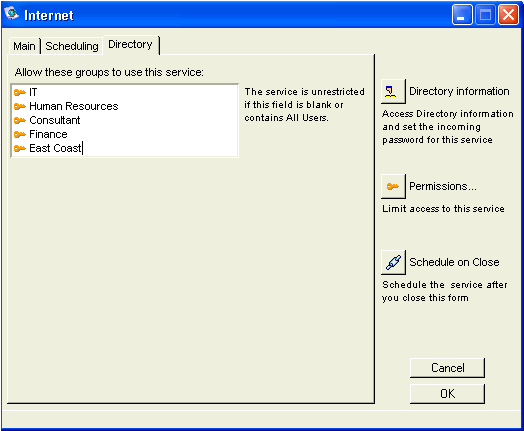
12 Click the Directory tab and enter the other groups (excluding the original groups you entered in Step 9) in "Allow these groups to use this service":
13 Click OK.
14 On each user group form
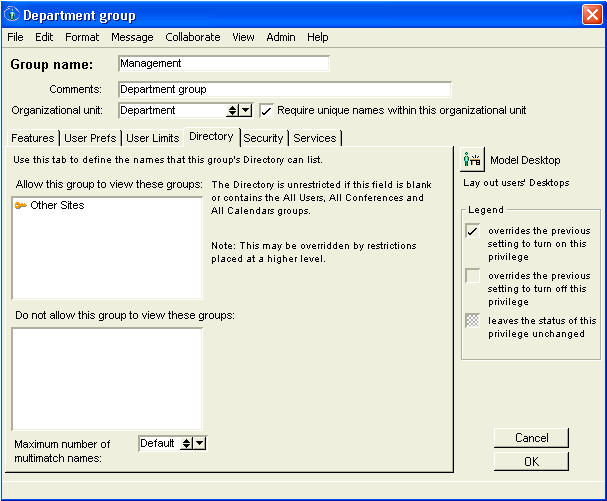
Click the Directory tab and enter Other Sites in "Allow this group to view these groups":
This enables each user group to see other gateways.
Note
If the user group is already configured to see all other sites, you do not have to configure the Directory tab.
15 Click OK.
Now, all mail for the Management, Sales, and Marketing groups routes through a separate SMTP clustered service and all other employee mail continues to route through the primary Internet Services.
Inbound HTML
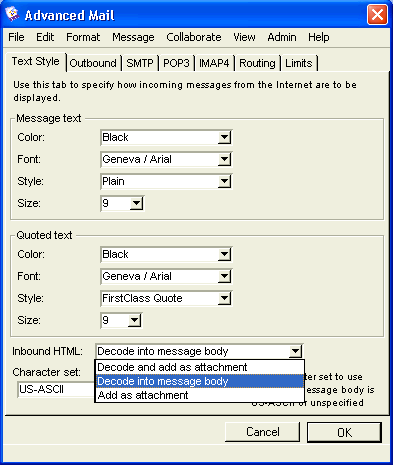
You can now choose how to receive inbound HTML messages in FirstClass. By selecting the appropriate option on the Internet Services/Advanced Mail form, you can have your users receive decoded HTML.
These are your choices (available on the Advanced Mail form) for receiving inbound HTML messages:
• in the body of their messages and as an attachment
• in the body of their messages only
• as an attachment only.
This new feature gives you more control of how incoming messages are displayed and prevents auto opening of attachments.
New in the FirstClass Client
Three 7.0 features of the FirstClass client are:
• conflict notification
• using backgrounds in messages
• printing enhancements.
Calendaring: Conflict Notification
A convenient new feature of calendars is conflict notification using a graphical indication of availability. If you try to book a meeting or make an appointment with one or more users, you can first look at whether they are available at the desired time.
If somebody has a prior commitment, you have two options:
• you can book the meeting or appointment anyway
In this case the sender receives a conflict notification, and the recipient sees a red line in front of the conflicting tasks.
• you can let FirstClass search for participants' next concurrently available time, and book the meeting or appointment then.
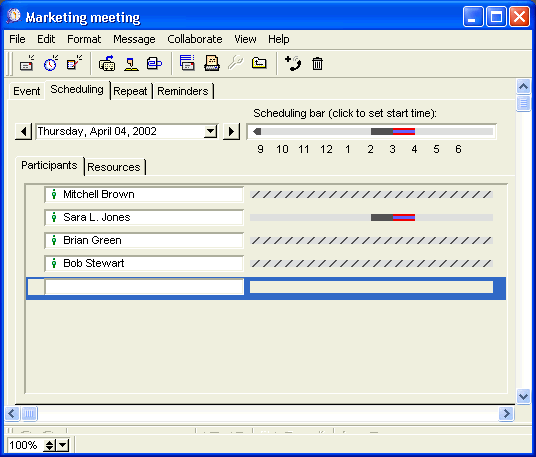
To reschedule an event, click the scheduling bar (located at the top of the Scheduling tab) at the new start time you want for this event. The time period covered by the event is indicated in blue on this and all other scheduling bars.
Conflicts are highlighted in red. Shaded times indicate that either you or your participants or resources are busy. Gray slashes in this bar indicate that you do not have permission to see this participant's busy times, while red slashes indicate that you cannot invite this participant.
Here is the Scheduling tab of an event that shows a conflict:
Using Backgrounds
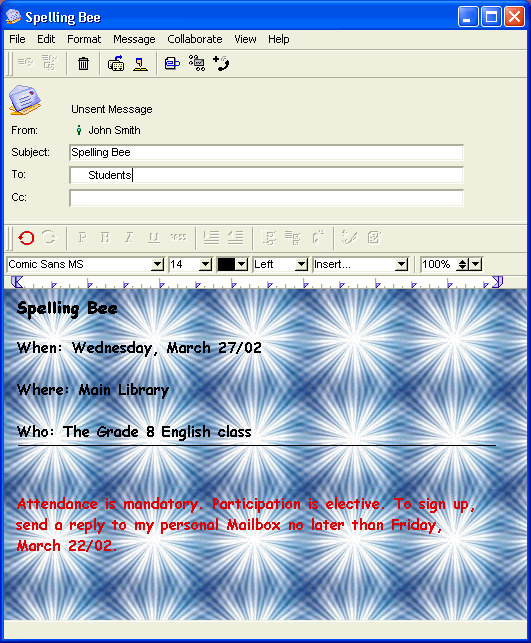
You can now add background images to your emails and documents. To do this, choose Format > Format Background from the main menu. You will be prompted for a file on your hard drive. This feature supports all the graphical formats that FirstClass normally supports.
Printing Enhancements
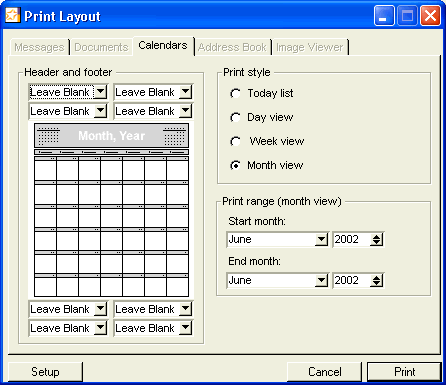
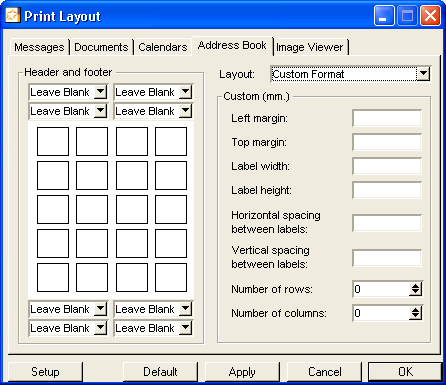
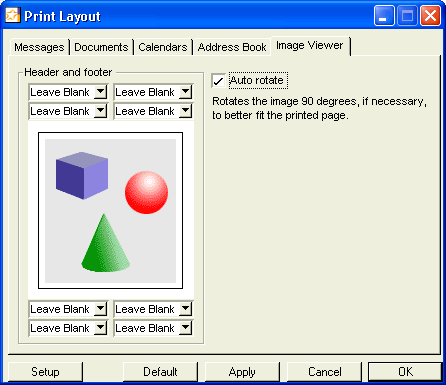
In 7.0, you can specify what information you want to print for messages, documents, calendars, address book entries, and the contents of the viewer window that shows an attached or embedded file.
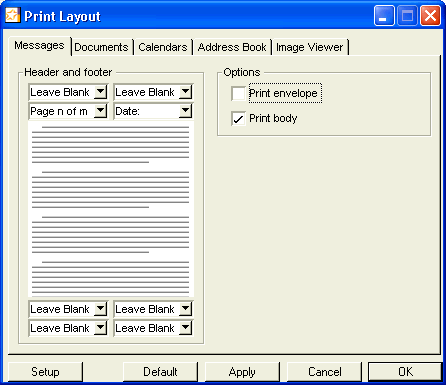
For example, you can choose to print just the body of messages and documents, or the envelope and the body. For all objects, you can specify which elements to put in the header and/or footer, and where in the header and/or footer to locate these elements.
You can print the Today list, or the day, week, or month view of a specific calendar. You can also specify a date range to print. To accomplish this, open the calendar, and then choose File > Print.
You can print labels based on your address book. You can customize the format of the labels, or choose predefined Avery standards.
You can specify how to print the contents of the viewer window that shows an attached or embedded file.
To specify print layout defaults for any of these objects:
1 Choose File > Print Layout.
2 Specify the print layout defaults on the appropriate tab of the Print Layout form.
To specify a default without closing the Print Layout form, click Apply.
To reset all print layout defaults to the FirstClass defaults, click Default.
Be cautious about clicking Default. Defaults for all objects will be reset, not just the defaults showing on the active tab.
FirstClass now simplifies the entire licensing process, by no longer restricting the process to using floppy disks to retrieve and install FirstClass licenses. How does this work? Electronic licenses can now be delivered directly as an email attachment or downloaded from a secure account on FirstClass Online. An electronic license can be stored on, and then applied from, a server's local drive, network drive, or an archival CD or floppy disk. The Macintosh community will especially appreciate this new feature, since Mac OS servers no longer include an internal floppy drive. In addition, applying new
license limits will no longer require planned server down time, as you can license your server through batch administration while the server remains online.
Electronic licensing has these benefits:
• floppy disk drive on the server is no longer mandatory
• simplified procedure to apply licenses
• no service impacts, since licenses may be applied via batch administration
• rapid customer access to newly purchased licenses.
Electronic licenses (user limits, session limits, MP Option, Unified Communications Option, TTS engine limits) are now keyed to a specific server serial number, and are not transferable to any other FirstClass server.
Customers with a current Maintenance and Support contract are automatically entitled to upgrade to FirstClass 7.0 at no additional charge. Prior to downloading the FirstClass 7.0 update, you will need to notify Centrinity of your company name, server serial number(s), contact's name and email address, and country. This is necessary so that we may send you the FirstClass 7.0 upgrade license, as well as future upgrade licenses. Please visit our website at www.centrinity.com and click on the FirstClass 7.0 Upgrade link (this will be available in
July), or call us directly at 1-888-588-3444, to provide the contact information.
The methods outlined below describe three different ways to apply a license file to your server.
Only the Admin account can update licensing.
Licensing Using a File with FirstClass Tools
These instructions are also located in FirstClass Tools Reference.
To license the post office from a file:
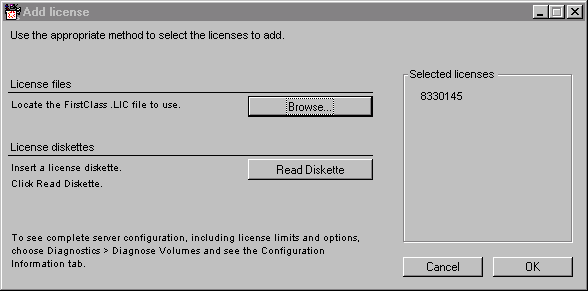
1 Start the FirstClass Tools application.
If you haven’t licensed your server, the Add license form appears. If the Add license form does not appear, display it by choosing Configure > Add License.
2 Click Browse (Windows) or Choose (Mac OS).
3 Select the license file that Centrinity provided.
Note
If this is a new installation, you must apply the license serial number file first (nnnnnnn.KEY). After the server has been assigned a serial number, you can add one or more license files (nnnnnnn.LIC) in any order.
If you receive an error message when you try to add licenses, make sure you have already applied a server serial number (nnnnnnn.KEY).
4 Click OK.
The license is immediately updated.
5 Exit from FirstClass Tools (Windows) or Quit (Mac OS).
6 Restart both the FirstClass server and Internet Services.
Licensing Using Batch Administration
You may receive these instructions with your license file.
To update your server using batch administration (batch admin):
1 Log into your FirstClass Admin account.
2 Create a new message addressed to batch admin.
Batch admin does not multi match, so you must enter the full address.
3 Attach the license file to the message.
Warning
If this is a new installation, the server license (nnnnnnn.KEY) must be added first. Additional licenses (nnnnnnn.LIC) can be added in any order.
4 Enter the following into the message body:
license add attachmentname
For example, if the license file is called 7620000.LIC, you would enter:
license add 7620000.lic
5 Send the message.
Licensing Using a Form
You may receive these instructions with your license file, depending upon your upgrade method.
1 From the Admin account
Forward the Online Licensing form to batch admin.
Batch admin does not multi match, so you must enter the full address.
2 Set the Licensing action field appropriately.
For example, if you are adding a license, set the field to Add attached license.
Only one license file can be submitted per form.
Warning
If this is a new installation, the server license (nnnnnnn.KEY) must be added first. Additional licenses (nnnnnnn.LIC) can be added in any order.
3 Click Submit.
For those of you who haven't delved into online help recently, here's a behind-the-scenes look.
A Little History
Starting with version 6.0, we moved our online help from the client to the server. This had the advantages of lightening the client and ensuring that online help was available not only from the client, but from web browsers. With version 7.0, we put the documentation that had been in paper form online, so that it would always be available.
Online Help Source Structure
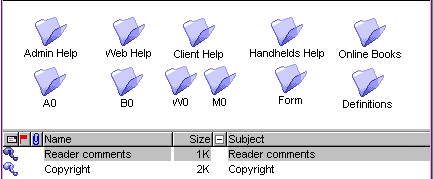
The help consists mainly of FirstClass documents (a few books are still in PDF format). The help source is in Multi-Site Setup/FC Resource Registry/En/OnlineHelp, and is organized like this:
Admin Help Help for administrators.
Web Help Help for users with web browsers.
Client Help Help for users with the FirstClass client.
Handhelds Help Help for users with handheld devices. This help must be viewed from the Help icon on handhelds users' Desktops, because there is no Help button on the mobile templates.
Online Books Books that were previously in print format, or are considered too conceptual or specialized for general help.
A0-M0 These are what you and your users see when you call the help contents. They contain appropriate help for the user or platform (administrators see A0, web browser users see B0, Windows users see W0, and Mac OS users see M0).
Form Help that is called from forms.
Definitions Definitions that pop up from links in the other help documents.
How We Link to Help
By default, the administrator's Desktop contains the following help links: Admin Help and Help (which links to all the other OnlineHelp containers). The All Users Desktop contains a link to the Help link on the administrator's Desktop. To enable web browsers to call help, a link to OnlineHelp is also placed in the Internet Services/WWW folder.
What Your Users See
When your client users choose Help > Contents (Shift F1), W0 or M0 are opened. They contain client help, definitions, and online books. When your web browser users click Help Contents, B0 is opened. It contains web help, definitions, and online books.
When your client users have a form open and choose Help > About this Window (F1), the help document describing that form opens. The same thing happens when your web browser users click About this Form.
When your users open the Help icon on their Desktops, they see all the contents of OnlineHelp except Admin Help.
Sneaky Tips
Both you and your users can use Up One Level to see more help than is currently displayed, whether you are using the menu or a Desktop icon. So if you are at W0, Up One Level moves you to OnlineHelp. This lets a user with a web browser, for example, check the help for handheld devices. It also, of course, lets users get at Admin Help.
You can use the new Print Layout feature (as described in our help) to print online books or help documents the way you want. This means you can suppress document envelopes and specify what (if anything) you want in the printout headers and footers.
What You as Administrator Can (And Can't) Do
As for any other default icons, you can reposition or remove the Help icon on the All Users Desktop, or alter the contents of this icon. Help is still available from the menu.
Although you can customize both links to help and the help source in the Resource Registry, upgrades will necessitate redoing this customization, as you'll see below.
And there are things that you can't do, or help won't work properly. This obviously includes deleting help documents, but it also means not changing the structure of the help source. For example, for links between documents to work, the containers storing those documents must all be in A0, W0, M0, and B0. So if you were to delete the Definitions container from W0, no popup definitions would work for Windows users.
Take Care When Reading Help
When you use the FirstClass client as administrator, you will see online documentation in an editable mode (this also applies to subadministrators). So remember to be careful about window resizing and positioning (not to mention altering content).
Unfortunately, being in editable mode also means you can't just click a link to open it. You have to choose Open Link from the shortcut menu instead.
What Happens During Server Upgrades
There are three batch admin scripts that run as part of the server install.
The first script:
• renames the En container, so there is a backup of the old help
If you were to customize the old help documents, this is where you will find your customization. If you altered links to help containers, you will have to recreate your customized linking.
• deletes the help container links in WWW and on the administrator's Desktop
• recreates the En and OnlineHelp containers
• recreates the link to OnlineHelp in WWW.
Paving the Way
The first script doesn't just work with the En container, but with a link to this container called En-us. This link is created (and renamed) in tandem with En, to prepare for future localization of help.
The second script recreates the source containers in OnlineHelp and populates these containers with the help documents.
The third script recreates the help container links on the administrator's Desktop.
Centrinity is announcing the FirstClass Introduction Edition, to be released later this year. This new edition is a free fully functional FirstClass groupware server (core server and Internet Services) for up to 5 users.
Since the Introduction Edition is not time limited, it is also suitable for production use in small offices, home offices, technology classes, and so on. As a FirstClass administrator, you can take advantage of the Introduction Edition by loading it onto your test servers instead of using up your existing licenses.
Centrinity's Customer Support service is not included with the Introduction Edition, but peer-to-peer help conferences and information are available online.
The FirstClass Introduction Edition includes:
• 5 Regular user licenses
• 5 RAD sessions
• Internet Services
• server-to-server gateways.
You can upgrade the Introduction Edition at any time to the Business or Education Edition (as the communications needs of the site expands) by purchasing a license package from Centrinity Inc. Upgrading simply involves applying the installation of an electronic license to your FirstClass server. No system configuration or post office content is altered during the upgrade, so as not to interrupt FirstClass.
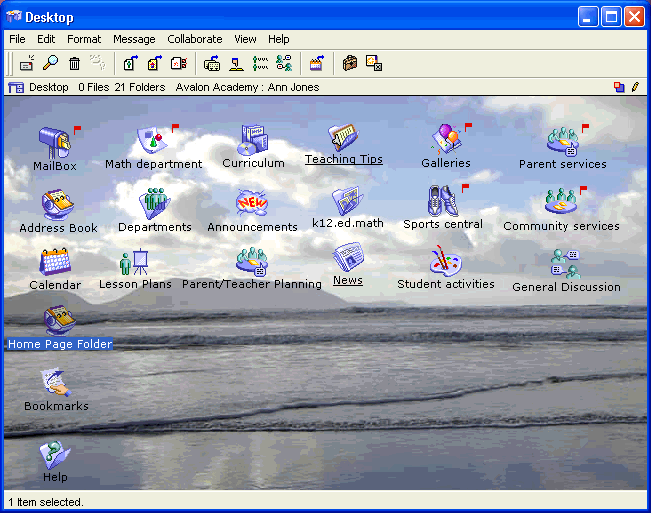
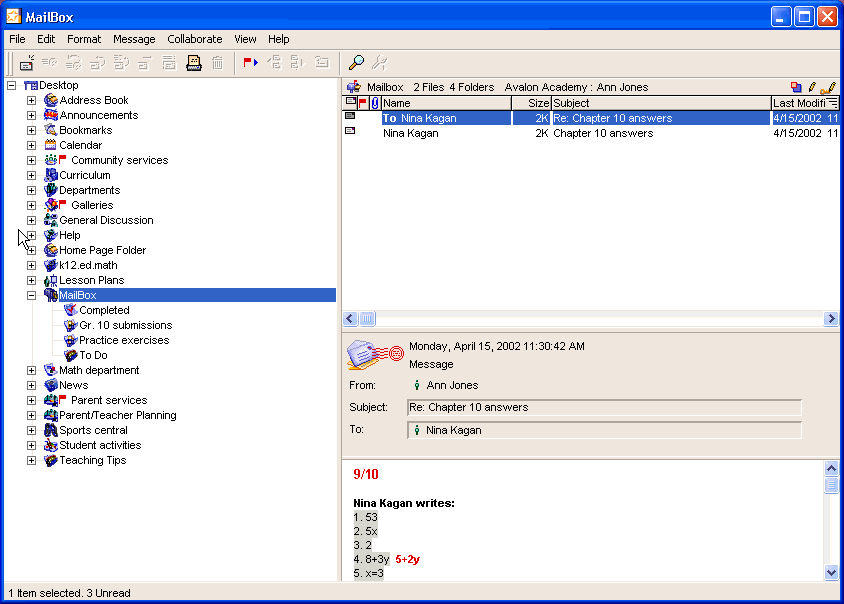
Here is the FirstClass Explore view of the same Desktop:
The left pane shows the containers on your Desktop hierarchically. You can open and close these containers to reveal their contents, just as you normally do in your operating system.
The top right pane shows the contents of the container that is selected in the left pane. These contents are shown in List view.
The bottom right pane opens the object that is selected in the top right pane. You can work with this object just as you could if you opened it in the FirstClass Classic view.
Additionally, objects in this view open with a single click, and you can scroll through items easily using the spacebar.
You can choose the FirstClass Explore view on the fly (View > Explore), or set your Desktop to always open in this view.
If you are in a different time zone than your server, you will need to adjust your client's time zone so that dates and times display in your local time. To do this, choose the appropriate time zone at "Time zone" in your viewing preferences. Make sure you choose the time zone that applies to your exact location.
FirstClass automatically adjusts for standard and daylight savings times.
courtesy of the IT Department
Upgrade Checklist for FirstClass 7.0
To facilitate your upgrade to FirstClass 7.0, we have provided a checklist to make sure you consider all factors. Print this out and post it near your server so you have it ready when it's time to upgrade.
Plan for Down Time
In order to upgrade your server, you will need to shut down the FirstClass server and Internet Services for a few minutes. The upgrade will take less than five minutes to execute.
Trial Restore of Post Office
You should have a recent backup of your post office before starting the upgrade. If you haven't done a trial restore of your post office, schedule time for this event before you do the upgrade.
Administer Your System with the 7.0 Client
Once you upgrade, always log into the admin account with the 7.0 client. Your users can continue to use older clients.
Optional Changes
You don't need to do anything after you upgrade, however here are some suggestions on what you may want to change after you upgrade. There's no urgency here, you can implement each suggestion whenever the time is right for your users:
Review User Group Names
You will have the option of displaying a group name alongside a user's name in the Directory and Who's online. If the names are not appropriate, decide on new names for the groups. When a group name changes, all your permissions and user info forms will automatically pick up the new name. With the 7.0 client and server you will have 31 characters to work with.
Determine Settings For New Privileges and Preferences
The Set Expiry privilege has added functionality in 7.0. In addition to granting users the ability to change the expiry date on outgoing mail, the privilege allows users to set permissions for their Mailboxes. The 7.0 client is needed to set Mailbox permissions. Review which groups have this privilege now and determine which groups will be receiving this privilege after 7.0.
You will be able to set the reply preference at a group level. Determine which groups will receive which preference.
Private mail expiry can now be set at a group level. Determine which groups need a new private mail expiry. If you intend to drastically reduce the private mail expiry for a large number of users, you may want to phase in the change to avoid a lengthy trash collection.
It may also be important to let the users know that a new message expiry policy is about to be implemented with the potential of deleting messages that they perhaps wanted to keep around. Of course this last point is moot if the default is set to Never. A new server is set to a 60 day default private mail expiry and some sites never change it.
If your users want to set up POP3 mail retrieval, you will be able to give them the privilege of maintaining their own accounts with the Mail Import privilege.
Internet Mail Domain
In 7.0, you will be able set a mail domain name at a group level. If you have fully qualified mail domains, determine which groups will change. Notify users of their new email address. If you plan to have the user keep both the new and old email address, prepare the batch admin script.
Time Zones
You will have the option to enable time zones. If you have offices in different time zones, you may want to create a user group for each time zone, and add users to a time zone. Additionally, users will be able to set their own time zone at any time. Time zones are set differently for the FirstClass server and client. See the appropriate documentation (FirstClass Administrator's Guide for server, online help for client) for instructions.
Electronic Licenses
With 7.0 your new licenses may be emailed to you, depending on where you are located. Create a "FirstClass Licenses" conference on the admin Desktop and set the expiry time to Never. Assign permissions, and protect the conference. When you receive licenses store them in this conference.
Review Standard Templates
The new standard templates are accessible by logging into www.centrinity.com. Visit us for a preview of these new templates.
Third party demonstration software is provided on an as is basis, without warranty by Centrinity. Please refer to your license agreement for additional terms and conditions.
For detailed information on working with FirstClass Rapid Application Developer, see FirstClass Rapid Application Developer 2 Guide.
RAD must be installed on a Windows NT server. However, you only need a FirstClass Windows or Mac OS client to work on it and run it.
Password Helper
Overview
Password Helper eliminates the question "What's my password?". The administrator, or any user with the appropriate privileges, can look up and easily modify passwords. This eliminates the need to create additional subadministrator accounts.
This software requires:
• RAD 2.x installed
• FirstClass Server 6.x or higher
• ODBC driver versions 4.00.xx or higher.
These ODBC drivers are installed with Windows 2000, and can be added to Windows NT installations at no cost using the Microsoft Data Access Components (MDAC) from the Microsoft web site.
Features
• Look up a password, voice DN, or voice password by simply entering the user ID.
• Restrict a user to only looking up users in a specific privilege group (for example, a user may only look up passwords for users in the accounting department).
• Easy-to-use administrator setup panel for distributing the Password Helper application.
Installation Instructions
1 Download the Installer application.
PasswordHelper.exe (1MB)
2 Shut down your FirstClass server.
3 Run the Installer application.
4 Start your FirstClass server.
You will see the Password Helper Admin icon on the administrator's Desktop:
Configuring the Password Helper Application
1 Double-click the Password Helper Admin icon on the administrator's Desktop.
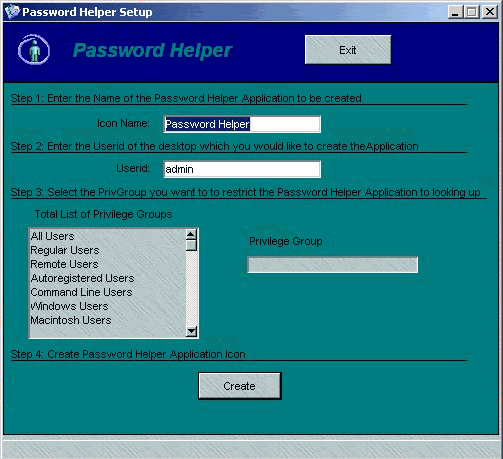
2 Follow the steps on the setup panel to create the Password Helper application.
In Step 3 on the form you have the ability to restrict which privilege group you would like to look up. For no restrictions use the All Users privilege group.
After clicking Create, an icon will be created and assigned the icon name defined in Step 1 on the form. It will be located on the Desktop of the user whose user ID was specified in Step 2 on the form.
Using the Password Helper application
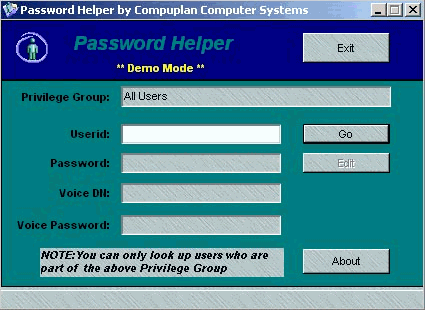
1 Double-click the Password Helper application icon on the Desktop.
You will see:
Note
By default, the application is installed in Demo Mode. Demo Mode is restricted to looking up user IDs beginning with the letter 'A' only. To unlock the product you will need to purchase a license key.
2 Enter the user ID of the user you wish to look up.
3 Click Go.
This will retrieve the passwords and display them in the boxes below. Upon successful completion of retrieving the password, the Edit button will be available.
To edit the password:
1 Click Edit.
2 Modify the password fields.
3 Click Update.
This button will appear when you make changes to the password fields.
License Key for Password Helper
License keys are unique to each server. When ordering your copy of Password Helper you will need to include your server serial number so we can send you a license key. Once you have received your license key you will need to enter the key on the "About" panel of the Password Helper Application.
To order your copy of the Password Helper application or for further information about this RAD application, go to www.compuplan.bc.ca.
Application Developer
Brandon Shilson
750-999 West Broadway Avenue
Vancouver, British Columbia, Canada
V5Z 1K5
Phone: (604) 736.7111
Fax: (604) 736.7618
General Information/Sales: sales@compuplan.bc.ca
Use of this software is subject to the terms outlined in the License Agreement available online. Installation of this software constitutes agreement with these terms.
Certain features mentioned here may not yet be released, and may not be currently available in all geographic regions. Centrinity Inc. reserves the right to modify or cancel any features mentioned here.
• Preventing SPAM Relaying
How to secure your FirstClass server to prevent it from being used as a SPAM relay. SPAM blocking techniques will be discussed as well.
• Creating FirstClass Voice Menus and Voice Greetings
A look at the different uses for voice menus, including sample scenarios, and how to create and customize voice greetings
• FirstClass Security
A look at the security features of FirstClass, and an answer to the question, "How is FirstClass secure?"
Other Languages
Would you prefer to receive this newsletter in a language other than English? Please let us know so we can make localization arrangements.
Share Your Thoughts and Ideas
Do you have additional knowledge to share? New information or handy tricks to reveal? Please send them to us. In addition, send us questions you want answered by developers and technical staffers, suggestions for articles and content, queries about how to perform tasks that may make your job easier, and general comments about our newsletter.
Site Visits
The Information Development team conducts site visits to gain feedback from administrators and users of FirstClass. Previous visits have always proved successful, and were found mutually beneficial. If you would like to schedule a site visit for your company (currently in the Greater Toronto Area only*), send us an email.
*If you are outside of the Greater Toronto Area, we can organize a teleconference so you can still take advantage of the benefits these meetings provide.
Please send all correspondence to the TechNewsMail conference (TechNewsMail@centrinity.com).
Editors: Annette Ferron, Ann Schwartz
TechNewsMail@centrinity.com (TechNewsMail conference)
sales@centrinity.com (Sales)
support@centrinity.com (Centrinity Customer Support)
centrinity_id@centrinity.com (Information Development)
Please send all correspondence to the TechNewsMail conference (TechNewsMail@centrinity.com).
Main number: 905.762.6000
Main fax number: 905.762.6151
Toll-free number: 1.888.588.3444
Our address is:
Centrinity Inc.
38 Leek Crescent
Richmond Hill, ON
Canada, L4B 4N8
Documentation
Looking for new documentation? Existing documentation? Check out the documentation section of our new web site Documentation.
In FirstClass 7.0, many of our latest books can be found right in your online help.
Training
The Richmond Hill office holds customized training courses throughout the year. For a training schedule or course descriptions, including prerequisites, see Training on our web site. If you have any questions, please address them to Centrinity Training or training@centrinity.com.
Previous newsletters can be found at Welcome to The FirstClass Newsletter on our web site.
We want this newsletter to reach all of the people in your organization who will directly benefit from it. If you would like to subscribe anybody else to this newsletter, please provide us with their email address or FirstClass account. Enter SUBSCRIBE as the subject line.
Unsubscribing
If you would like to unsubscribe to this newsletter, send us an email with the subject line UNSUBSCRIBE.
Please send all correspondence to the TechNewsMail conference (TechNewsMail@centrinity.com).
Information in this document is subject to change without notice. Certain features and products described in this document may not yet be released, and may not be currently available in all geographic regions.
All rights reserved. FirstClass is a registered trademark of a Centrinity Inc. subsidiary used under license. Centrinity, the Centrinity logo, and the FirstClass logo are trademarks of Centrinity Inc. All other trademarks are property of their respective owners.
This document is bound by international copyright law and the FirstClass Software License Agreement and Limited Warranty included with every FirstClass product.
|

